SpringBoot
SpringBoot 简化了 Spring 应用开发,约定大于配置,去繁从简,just run 就能创建一个独立的,产品级别的应用。
SpringBoot2 要求 java8 及以上, maven3.3 及以上。(查看方式:java -version,mvn -v)
参考文档:SpringBoot2 核心技术与响应式编程
简介
快速创建独立运行的 Spring 项目以及与主流框架集成
使用嵌入式的 Servlet 容器,应用无需打成 war 包
starters 自动依赖与版本控制
自动配置简化开发,无需配置 XML 开箱即用
运行时应用监控与云计算的天然集成等
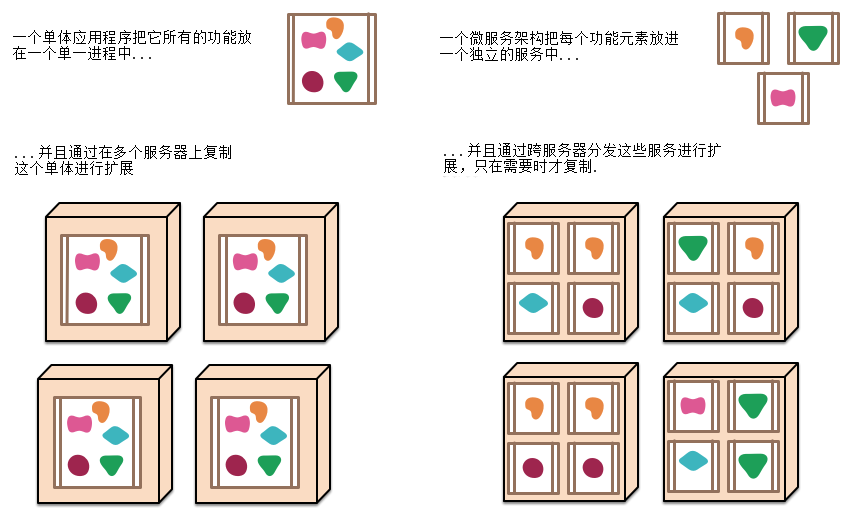
微服务简介
架构风格(服务微化)
一个应用应该是一组小型服务,各个服务之间可以通过HTTP的方式进行互通关联
每一个功能元素最终都是一个可独立替换和独立升级的软件单元。
详细请参照:微服务详解中文版
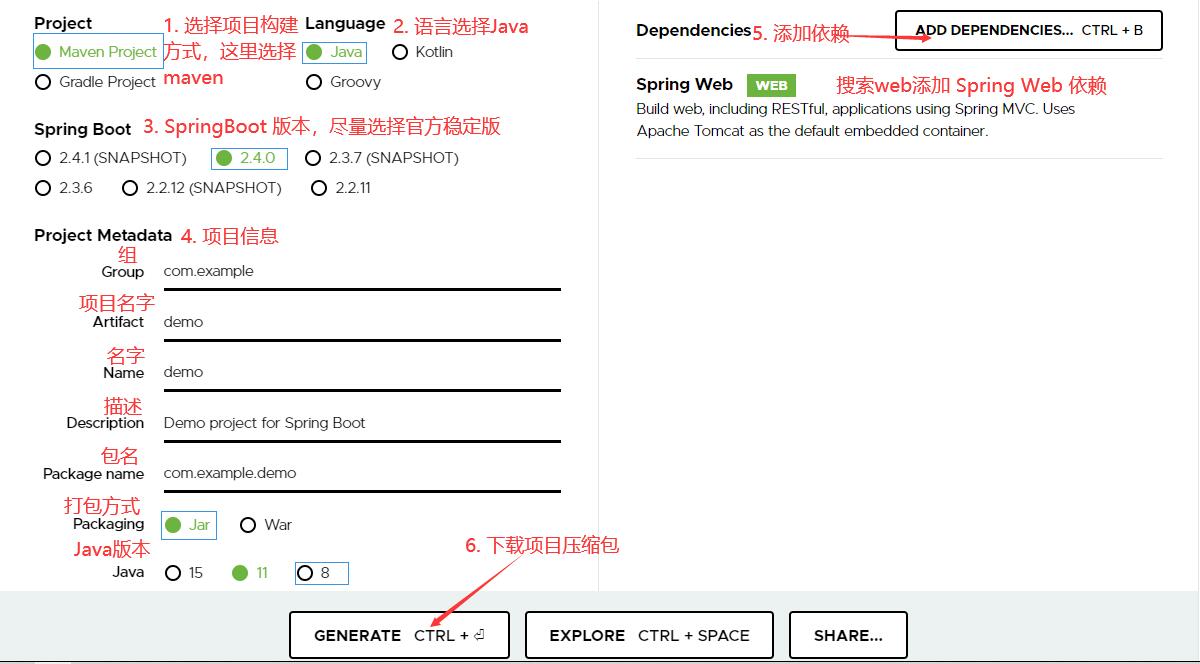
创建项目 1. 官网创建: 官方创建 SpringBoot 项目网址:https://start.spring.io/
将下载下来的项目压缩包解压使用 IDEA 打开,我们就初始化成功了一个 spring boot 项目。
2. 手动创建: 参考地址:Getting Started (spring.io)
使用 IDEA 创建一个普通 maven 项目
在 pom.xml 中导入 SpringBoot 依赖
1 2 3 4 5 6 7 8 9 10 11 12 <parent > <groupId > org.springframework.boot</groupId > <artifactId > spring-boot-starter-parent</artifactId > <version > 2.7.2</version > </parent > <dependencies > <dependency > <groupId > org.springframework.boot</groupId > <artifactId > spring-boot-starter-web</artifactId > </dependency > </dependencies >
编写主程序,启动 Spring Boot 应用:
新建 MainApplication 类作为主程序,类上使用 SpringBootApplication 注解表明它是 SpringBoot 的主程序。在类中创建 main 方法,并使用 SpringApplication.run 方法来启动 SpringBoot 项目。
1 2 3 4 5 6 7 8 @SpringBootApplication public class MainApplication { public static void main (String[] args) { SpringApplication.run(MainApplication.class, args); } }
编写业务:
新建 controller 包,新建 HelloController 类(注意:SpringBoot 主程序与 controller包同级)
1
2
3
4
5
6
7
8
@Controller public class HelloController { @ResponseBody @RequestMapping("/hello") public String hello () { return "hello world" ; } }
运行主程序(MainApplication)的 main 方法启动 spring boot 应用,在浏览器访问 http://localhost:8080/hello 可以看到浏览器中返回了 hello world 的字样。
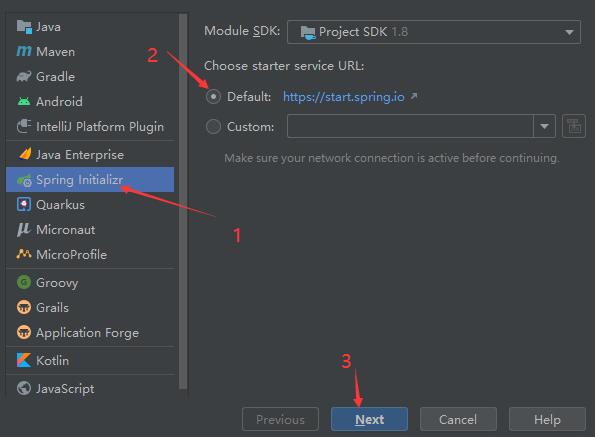
3. IDEA 创建:
选择初始化 spring 项目:
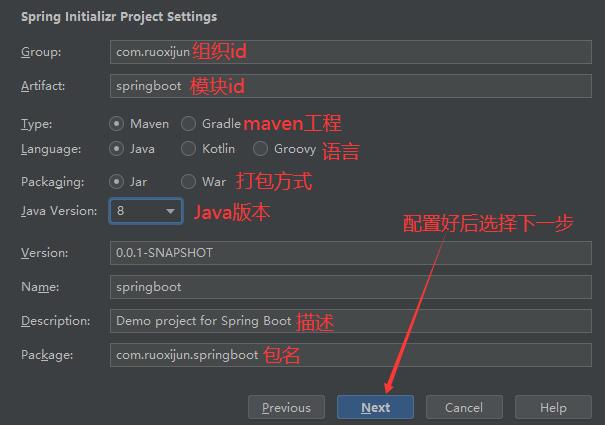
项目配置:
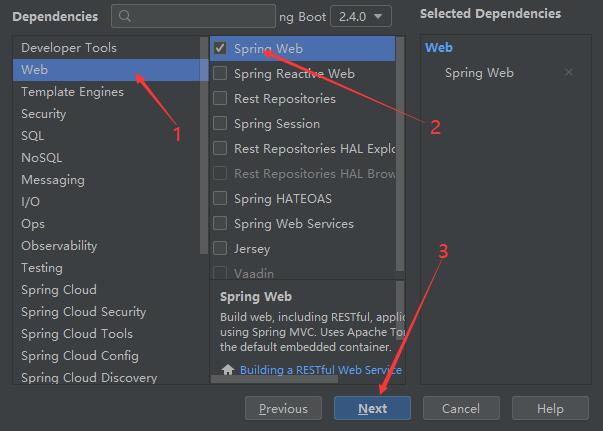
选择项目依赖(这里选择 spring boot 的 web 模块依赖)
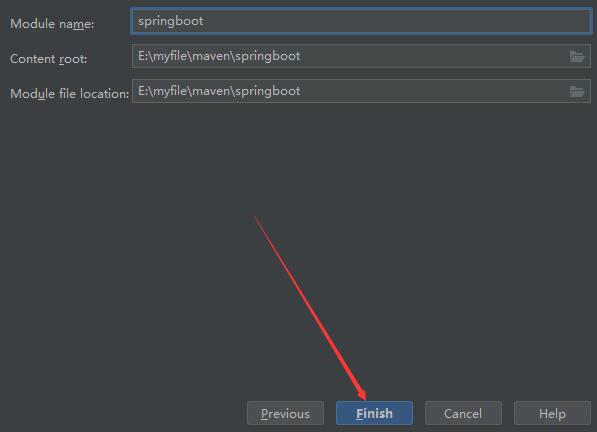
点击 finish 创建项目:
自动配置 依赖管理:
SpringBoot 中我们需要继承一个父项目 spring-boot-starter-parent 正是它来管理我们项目中的依赖,它也有一个父项目 spring-boot-dependencies 此项目中在 properties 内几乎声明了所有开发中常用依赖的所有版本号,这也被称之为 自动版本仲裁机制 。
如需自定义依赖版本号需要在我们项目的 pom.xml 添加 <properties></properties> 配置,在父项目中找到你需要修改依赖的 key 重写配置即可。
SpringBoot 提供以很多 starter, spring-boot-starter-* * 代表了一个具体的场景。SpringBoot 支持场景 Developing with Spring Boot
SpringBoot 支持自定义 starter 官方建议取名 *-spring-boot-starter ,所以我们看见的此类 starter 一般都是第三方为我们提供的 starter。
所有的 starter 场景都有一个底层依赖:
1 2 3 4 5 6 <dependency > <groupId > org.springframework.boot</groupId > <artifactId > spring-boot-starter</artifactId > <version > 2.7.2</version > <scope > compile</scope > </dependency >
初探自动配置: 以 web 场景为例:
为我们引入并配置好了 Tomcat:
1 2 3 4 5 6 <dependency > <groupId > org.springframework.boot</groupId > <artifactId > spring-boot-starter-tomcat</artifactId > <version > 2.7.2</version > <scope > compile</scope > </dependency >
自动配置好了 SpringMVC 常用组件,以及 web 常用功能:
1
2
3
4
5
6
7
8
9
10
11
12
13
@SpringBootApplication public class MainApplication { public static void main (String[] args) { ConfigurableApplicationContext run = SpringApplication.run(MainApplication.class, args); String[] beanDefinitionNames = run.getBeanDefinitionNames(); for (String beanDefinitionName : beanDefinitionNames) { System.out.println(beanDefinitionName); } } }
主程序(@SpringBootApplication)下的包及其子包默认被扫描,无需我们再手动配置包扫描。
1 2 @SpringBootApplication(scanBasePackages = "com.ruoxijun")
@ComponentScan 也能修改包扫描路径,但不支持与 SpringBootApplication 注解在同一类上。通过 @SpringBootApplication 源码可知:
1 2 3 4 @SpringBootConfiguration @EnableAutoConfiguration @ComponentScan
因此我们可以使用这三个注解来代替 SpringBootApplication 注解,一样可以实现 SpringBoot 功能。
各种配置拥有默认值,且我们配置文件(application.properties)的配置最终都会绑定在某一个类上,这个类对象存储在 IOC 容器中。
所有的自动配置项按需加载,我们引入了那个场景对应场景的自动配置才会开启。在 spring-boot-starter 包中引入了一个 spring-boot-autoconfigure 包 SpringBoot 所有的自动配置功能都在其中。
容器功能: 1. @Configuration: 使用:
使用 @Configuration 配置类注册组件:
1
2
3
4
5
6
7
8
9
10
11
12
13
@Configuration public class MyConfig { @Bean public User user () { return new User (); } @Bean("tom") public Pet pet () { return new Pet (); } }
1 2 3 4 5 6 7 ConfigurableApplicationContext run = SpringApplication.run(MainApplication.class, args);MyConfig myConfig = run.getBean("myConfig" , MyConfig.class); User user = run.getBean("user" , User.class); User user1 = myConfig.user(); Pet tom = run.getBean(Pet.class);
@Configuration(proxyBeanMethods = false) :可以获取到单实例组件(Lite 模式)
Full 模式:
标注有 @Configuration 或 @Configuration(proxyBeanMethods = true) 的类被称为Full模式的配置类。
生成 CGLIB 子类,单例组件之间有依赖关系时使用,方便管理。每次都会在容器中查找是否有此组件(没有时创建并加入容器),效率较低。
Lite 模式:
类上有 @Component 、 @ComponentScan 、 @Import 、 @ImportResource 、 @Configuration(proxyBeanMethods = false) 注解或类上没有任何注解,但是类中存在 @Bean 方法。
运行时不用生成 CGLIB 子类,提高运行性能,降低启动时间,可以作为普通类使用。不方便管理组件之间的依赖关系。
2. @Import:
可以作用在任意组件类的上方导入,值为任意类型组件数组,给容器中自动创建出对应类型的组件,默认组件的名字是全类名。
1 @Import({User.class, Pet.class})
3. @Conditional: @Conditional 条件装配注解,当满足条件时装配组件。
1
2
3
4
5
6
7
8
9
10
11
12
13
14
@Configuration @ConditionalOnMissingBean(name = "tom") public class MyConfig { @ConditionalOnBean(name = "tom") @Bean public User user () { return new User (); } @Bean("tom") public Pet pet () { return new Pet (); } }
在主程序中使用 run.containsBean("tom"); 检验是否存在某组件。
4. @ImportResource: @ImportResource 允许我们导入 spring 的 xml 配置文件。
1 2 @ImportResource("classpath:beans.xml")
5. 配置绑定: 读取 properties 文件中的内容,并且把它封装到 JavaBean 中。
1. 原生 java 方法: 1 2 3 4 5 6 7 8 9 10 11 12 13 public class getProperties { public static void main (String[] args) throws FileNotFoundException, IOException { Properties pps = new Properties (); pps.load(new FileInputStream ("a.properties" )); Enumeration enum1 = pps.propertyNames(); while (enum1.hasMoreElements()) { String strKey = (String) enum1.nextElement(); String strValue = pps.getProperty(strKey); System.out.println(strKey + "=" + strValue); } } }
2. 类已是组件:
IDEA 中使用 ConfigurationProperties 编辑器可能会提示 Spring Boot Configuration Annotation Processor not configured 未配置 Spring 引导配置注释处理器,引入如下依赖即可:
1 2 3 4 5 6 7 8 9 10 11 12 13 14 15 16 17 18 19 20 21 22 <dependency > <groupId > org.springframework.boot</groupId > <artifactId > spring-boot-configuration-processor</artifactId > <optional > true</optional > </dependency > <build > <plugins > <plugin > <groupId > org.springframework.boot</groupId > <artifactId > spring-boot-maven-plugin</artifactId > <configuration > <excludes > <exclude > <groupId > org.springframework.boot</groupId > <artifactId > spring-boot-configuration-processor</artifactId > </exclude > </excludes > </configuration > </plugin > </plugins > </build >
组件类上:
1 2 3 4 5 6 7 @Component @ConfigurationProperties(prefix = "mycar") public class Car { private String name; private int age; }
配置属性:
1 2 mycar.name = MyCar mycar.age = 18
组件中还支持 @Value(${属性}) 方式注入
3. 在配置类上开启:
为类绑定前缀
1 2 @ConfigurationProperties(prefix = "mycar") public class Car {}
在配置类声明开启:
1 2 3 4 @Configuration @EnableConfigurationProperties(Car.class) public class MyConfig {}
自动配置原理: @SpringBootApplication 注解有以下 3 个主要注解构成:
1 2 3 4 5 6 7 8 9 10 @SpringBootConfiguration @EnableAutoConfiguration @ComponentScan( // 指定扫描包 excludeFilters = {@Filter( type = FilterType.CUSTOM, classes = {TypeExcludeFilter.class} ), @Filter( type = FilterType.CUSTOM, classes = {AutoConfigurationExcludeFilter.class} )})
1. @SpringBootConfiguration: 主要构成如下:
@SpringBootConfiguration 表示 @SpringBootApplication 标记的类是一个配置类。
2. @EnableAutoConfiguration: @EnableAutoConfiguration 由以下两个注解构成:
1 2 @AutoConfigurationPackage @Import({AutoConfigurationImportSelector.class})
@AutoConfigurationPackage:
自动配置包指定了默认的包规则,查看源码 @Import({Registrar.class}) 可以发现它导入了一个 Registrar 组件,而查看这个组件源码可以发现它有一个方法会给容器注入一系列组件:
1 2 3 4 5 6 7 8 9 public void registerBeanDefinitions ( AnnotationMetadata metadata, // 注解原信息(注解标记位置、属性值...) BeanDefinitionRegistry registry) { AutoConfigurationPackages.register(registry, (String[])(new AutoConfigurationPackages .PackageImports(metadata)).getPackageNames() .toArray(new String [0 ])); }
由此可知 @AutoConfigurationPackage 作用是利用 Registrar 将 主程序(@SpringBootApplication) 包以及子包内的组件导入容器中。
AutoConfigurationImportSelector.class
查看 AutoConfigurationImportSelector 它会批量给容器导入一些组件:
1 2 3 4 5 1. 利用 getAutoConfigurationEntry(annotationMetadata) 给容器中批量导入组件2. 调用 getCandidateConfigurations(annotationMetadata, attributes) 获取到所有需要导入容器中的配置类3. 利用工厂 SpringFactoriesLoader.loadFactoryNames 最终调用 Map<String, List<String>> loadSpringFactories (ClassLoader classLoader) 方法得到所有配置类4. 加载文件 classLoader.getResources("META-INF/spring.factories" ) 默认扫描项目中所有 META-INF/spring.factories 位置文件核心包 spring-boot-autoconfigure.jar 的 META-INF/spring.factories 文件中配置了项目启动就需要全部加载的不同场景的配置类
3. 修改默认配置:
1 2 3 4 5 6 7 8 9 @Bean @ConditionalOnBean({MultipartResolver.class}) @ConditionalOnMissingBean(name = {"multipartResolver"}) public MultipartResolver multipartResolver (MultipartResolver resolver) { return resolver; }
1 2 3 4 5 6 7 @Bean @ConditionalOnMissingBean public CharacterEncodingFilter characterEncodingFilter () { }
由上可知 SpringBoot 默认会在底层配好所有的组件,但是如果用户自己配置了以用户的优先。因此我们想修改默认配置或定制化配置方法如下:
在自己的配置文件中 @bean 替换需要修改的组件。
通过查看配置类绑定了配置文件的哪些属性,在 properties 中修改配置值。
4. 总结:
SpringBoot先加载所有的自动配置类 xxxxxAutoConfiguration.class
每个自动配置类按照条件进行生效,默认都会绑定配置文件指定的值。 xxxxProperties.class 和配置文件进行了绑定。
生效的配置类就会给容器中装配很多相应场景的组件,并帮我们配置好组件相应功能。
配置文件 配置属性文档 Common Application Properties (spring.io)
常用配置: 在 resource 文件夹中新建 application.propertiesapplication.yml
1 2 3 4 5 6 7 8 9 server.port =8081 server.servlet.context-path =/bootTest spring.datasource.driver-class-name =com.mysql.cj.jdbc.Driver spring.datasource.url =jdbc:mysql://localhost:3306/test?useSSL=false&useUnicode=true&characterEncoding=utf8&serverTimezone=GMT%2B8 spring.datasource.username =root spring.datasource.password =88888888
properties 转 yml :在线yaml与properties互转
yml 配置方式:
绑定配置项:
1 2 3 4 5 6 7 8 9 10 11 12 @Component @ConfigurationProperties(prefix = "user") public class User { private String name; private int age; private Car car; private String[] arr; private List<String> list; private Set<String> set; private Map<String, Object> map; }
yml 配置方式:
1 2 3 4 5 6 7 8 9 10 11 12 13 14 15 user: name: ruoxi age: ${random.int} car: name: rouxiCar age: 1 arr: - 1 - 2 list: [ 3 , 4 ] set: [ 5 , 6 ] map: a: { a: map } b: { b: map }
启动图标: 在线生成字符图标工具:
http://www.network-science.de/ascii/ http://patorjk.com/software/taag/
推荐 :
Spring Boot banner在线生成工具,制作下载banner.txt,修改替换banner.txt文字实现自定义,个性化启动banner-bootschool.net
我们只需在 resource 文件夹下新建一个 banner.txt 文件,在该文本文件中粘贴你想要的SpringBoot启动时显示的字符图标就好了。
关闭图标:
1 2 3 SpringApplication app = new SpringApplication (MainApplication.class);app.setBannerMode(Banner.Mode.OFF); app.run(args);
热部署:
idea需要的设置:
file->settings->build->Build project automatically 勾选
file->settings -> Advanced Settings -> Allow auto-make to start even if developed application is currently running 勾选 (这是idea2020.2设置的位置其它版本请上网自查)
1. pom.xml 配置: 1 2 3 4 5 6 7 8 9 10 11 12 13 14 15 16 17 18 19 20 <dependency > <groupId > org.springframework.boot</groupId > <artifactId > spring-boot-devtools</artifactId > <optional > true</optional > </dependency > <build > <plugins > <plugin > <groupId > org.springframework.boot</groupId > <artifactId > spring-boot-maven-plugin</artifactId > <configuration > <fork > true</fork > </configuration > </plugin > </plugins > </build >
2. 主配置文件配置: 1 2 3 4 5 6 7 8 9 spring: devtools: restart: enabled: true additional-paths: src/main/java poll-interval: 3000 quiet-period: 1000
热部署快捷键 Ctrl+F9
打包: jar 包: 添加插件将 spring boot 应用打包为可执行 jar 包并运行,pom.xml 中添加如下代码
1 2 3 4 5 6 7 8 <build > <plugins > <plugin > <groupId > org.springframework.boot</groupId > <artifactId > spring-boot-maven-plugin</artifactId > </plugin > </plugins > </build >
在打包的 jar 包位置使用 java -jar 项目的jar文件名 命令即可运行。
如不能成功请尝试关闭 cmd 快速编辑模式(右击 cmd 窗口点击属性)
war 包: 将文件打包为war包,在pom.xml中配置:
1 2 <packaging > war</packaging >
因为 SpringBoot 中默认内置 tomcat 服务器,我们需要将它内置的 tomcat 在打包时忽略掉因此在 pom.xml 的 dependencies 配置中添加:
1 2 3 4 5 <dependency > <groupId > org.springframework.boot</groupId > <artifactId > spring-boot-starter-tomcat</artifactId > <scope > provided</scope > </dependency >
最后在 SpringBoot 启动类中继承 SpringBootServletInitializer 类重写 configure 方法,之后打包即可:
1 2 3 4 5 6 7 8 9 10 @SpringBootApplication public class MainApplication extends SpringBootServletInitializer { public static void main (String[] args) { SpringApplication.run(MainApplication.class,args); } @Override protected SpringApplicationBuilder configure (SpringApplicationBuilder builder) { return builder.sources(MainApplication.class); } }
Profile: 环境配置:
application.properties (yaml 同理)表示默认环境配置,SpringBoot 还支持我们开启和配置不同环境的配置文件。
自定义环境配置文件 application-环境名称.yaml ,常用配置环境名称有 dev 开发环境、 test 测试环境、 prod 生产环境。
默认配置文件与环境配置文件同时生效,且同名配置环境配置优先。
在 application.properties
1 spring.profiles.active =dev # 激活并使用 application-dev 中的配置
1 2 3 4 5 spring.profiles.active = production spring.profiles.group.production[0] =proddb spring.profiles.group.production[1] =prodmq
1 2 3 4 5 (1 ) classpath 根路径 (2 ) classpath 根路径下 config 目录 (3 ) jar 包当前目录 (4 ) jar 包当前目录的 config 目录 (5 ) /config 子目录的直接子目录
自定义 starter 原理解析 (https://www.yuque.com/atguigu/springboot/tmvr0e)
web 开发 静态资源: 静态资源使用: 在 SpringBoot 中规定 resources 下的 /META-INF/resources 、 /resources 、 /static、 /public (同名文件按此优先级)等文件夹都可以存放静态资源我们只需按规定建立文件夹即可。
在配置文件中指定 resources 文件夹中的哪些文件夹为静态资源文件夹:
1 2 3 4 5 spring: web: resources: static-locations: classpath:/public/,classpath:/static/,classpath:/staticFile
为静态资源设置访问前缀:
1 2 3 spring: mvc: static-path-pattern: /static/**
SpringBoot 中默认静态资源文件夹下的 index.html 为首页(不推荐),直接访问项目根路径将访问到此页面(未设置静态资源访问前缀的情况下)。
设置网页图标只需在静态资源文件夹中添加名为 favicon.ico 的图片即可。
自定义静态资源处理规则: 如我们需要访问指定位置的文件时可以如下配置:
1 2 3 4 5 6 7 8 9 10 @Configuration public class WebConfig implements WebMvcConfigurer { @Override public void addResourceHandlers (ResourceHandlerRegistry registry) { registry.addResourceHandler("/file/**" ) .addResourceLocations("file:E:\\myfile\\" ); } }
静态资源配置原理: 1. WebMvcAutoConfiguration: SpringBoot 启动时自动加载 xxxAutoConfiguration 类,其中 SpringMvc 功能的自动配置类 WebMvcAutoConfiguration 加载成功且生效:
1 2 3 4 5 6 7 8 9 10 @AutoConfiguration( after = {DispatcherServletAutoConfiguration.class, TaskExecutionAutoConfiguration.class, ValidationAutoConfiguration.class} ) @ConditionalOnWebApplication( type = Type.SERVLET ) @ConditionalOnClass({Servlet.class, DispatcherServlet.class, WebMvcConfigurer.class}) @ConditionalOnMissingBean({WebMvcConfigurationSupport.class}) @AutoConfigureOrder(-2147483638) public class WebMvcAutoConfiguration { ... }
2. WebMvcAutoConfigurationAdapter: 在 WebMvcAutoConfiguration 有一个配置类 WebMvcAutoConfigurationAdapter :
1 2 3 4 5 @Configuration( proxyBeanMethods = false ) @Import({WebMvcAutoConfiguration.EnableWebMvcConfiguration.class}) @EnableConfigurationProperties({WebMvcProperties.class, WebProperties.class}) @Order(0) public static class WebMvcAutoConfigurationAdapter implements WebMvcConfigurer , ServletContextAware {...}
这个类绑定了两个配置属性: WebMvcProperties.class = spring.mvc,WebProperties.class = spring.web
且这个配置类只有一个有参构造器,当配置类只有一个有参构造器时所有的参数都会自动充容器里面找 :
1 2 3 4 5 6 7 8 9 10 11 12 13 14 15 16 17 18 19 20 21 22 public WebMvcAutoConfigurationAdapter ( WebProperties webProperties, WebMvcProperties mvcProperties, ListableBeanFactory beanFactory, ObjectProvider<HttpMessageConverters> messageConvertersProvider, ObjectProvider<WebMvcAutoConfiguration.ResourceHandlerRegistrationCustomizer> resourceHandlerRegistrationCustomizerProvider, ObjectProvider<DispatcherServletPath> dispatcherServletPath, ObjectProvider<ServletRegistrationBean<?>> servletRegistrations) { this .resourceProperties = webProperties.getResources(); this .mvcProperties = mvcProperties; this .beanFactory = beanFactory; this .messageConvertersProvider = messageConvertersProvider; this .resourceHandlerRegistrationCustomizer = (WebMvcAutoConfiguration.ResourceHandlerRegistrationCustomizer)resourceHandlerRegistrationCustomizerProvider.getIfAvailable(); this .dispatcherServletPath = dispatcherServletPath; this .servletRegistrations = servletRegistrations; this .mvcProperties.checkConfiguration(); }
3. 静态资源处理规则: 在 WebMvcAutoConfigurationAdapter 配置类中有一个 addResourceHandlers 方法,它就是静态资源处理的默认规则:
1 2 3 4 5 6 7 8 9 10 11 12 13 14 15 16 17 18 19 20 21 22 public void addResourceHandlers (ResourceHandlerRegistry registry) { if (!this .resourceProperties.isAddMappings()) { logger.debug("Default resource handling disabled" ); } else { this .addResourceHandler(registry, "/webjars/**" , "classpath:/META-INF/resources/webjars/" ); this .addResourceHandler(registry, this .mvcProperties.getStaticPathPattern(), (registration) -> { registration.addResourceLocations(this .resourceProperties.getStaticLocations()); if (this .servletContext != null ) { ServletContextResource resource = new ServletContextResource (this .servletContext, "/" ); registration.addResourceLocations(new Resource []{resource}); } }); } }
4. 欢迎页处理规则: 在 WebMvcAutoConfiguration 类中有一个 EnableWebMvcConfiguration 配置类:
1 2 @EnableConfigurationProperties({WebProperties.class}) public static class EnableWebMvcConfiguration extends DelegatingWebMvcConfiguration implements ResourceLoaderAware {...}
其中向容器注册了一个组件 WelcomePageHandlerMapping :
1 2 3 4 5 6 7 @Bean public WelcomePageHandlerMapping welcomePageHandlerMapping (ApplicationContext applicationContext, FormattingConversionService mvcConversionService, ResourceUrlProvider mvcResourceUrlProvider) { WelcomePageHandlerMapping welcomePageHandlerMapping = new WelcomePageHandlerMapping (new TemplateAvailabilityProviders (applicationContext), applicationContext, this .getWelcomePage(), this .mvcProperties.getStaticPathPattern()); welcomePageHandlerMapping.setInterceptors(this .getInterceptors(mvcConversionService, mvcResourceUrlProvider)); welcomePageHandlerMapping.setCorsConfigurations(this .getCorsConfigurations()); return welcomePageHandlerMapping; }
WelcomePageHandlerMapping 构造函数中:
1 2 3 4 5 6 7 8 9 10 11 12 WelcomePageHandlerMapping(TemplateAvailabilityProviders templateAvailabilityProviders, ApplicationContext applicationContext, Resource welcomePage, String staticPathPattern) { if (welcomePage != null && "/**" .equals(staticPathPattern)) { logger.info("Adding welcome page: " + welcomePage); this .setRootViewName("forward:index.html" ); } else if (this .welcomeTemplateExists(templateAvailabilityProviders, applicationContext)) { logger.info("Adding welcome page template: index" ); this .setRootViewName("index" ); } }
5. favicon.ico: 浏览器会默认请求项目下 /favicon.ico 作为标签页图标,并保存在 session 域中。因此在配置文件中设置了静态资源访问前缀,那么 /favicon.ico 就会获取不到相对应的图标了。
表单与 RestFul: 1. 开启方式: 一般浏览器 表单 不能发送 get、post 以外的其它请求(其它请求都被 get 请求代替,),SpringMvc 提供了 HiddenHttpMethodFilter 我们只需为 post 请求添加一个 _method 参数,参数值就是我们想使用的请求方式。
SpringBoot 允许我们在配置中开启这项功能:
1 spring.mvc.hiddenmethod.filter.enabled: true
2. 原理解析: 在 WebMvcAutoConfiguration 中:
1 2 3 4 5 @Bean @ConditionalOnMissingBean({HiddenHttpMethodFilter.class}) @ConditionalOnProperty( prefix = "spring.mvc.hiddenmethod.filter", name = {"enabled"} ) public OrderedHiddenHttpMethodFilter hiddenHttpMethodFilter () { return new OrderedHiddenHttpMethodFilter (); }
在 HiddenHttpMethodFilter 过滤器中:
1 2 3 4 5 6 7 8 9 10 11 12 13 14 15 16 17 18 19 20 21 22 23 24 private String methodParam = "_method" ; public void setMethodParam (String methodParam) { Assert.hasText(methodParam, "'methodParam' must not be empty" ); this .methodParam = methodParam; } protected void doFilterInternal (HttpServletRequest request, HttpServletResponse response, FilterChain filterChain) throws ServletException, IOException { HttpServletRequest requestToUse = request; if ("POST" .equals(request.getMethod()) && request.getAttribute("javax.servlet.error.exception" ) == null ) { String paramValue = request.getParameter(this .methodParam); if (StringUtils.hasLength(paramValue)) { String method = paramValue.toUpperCase(Locale.ENGLISH); if (ALLOWED_METHODS.contains(method)) { requestToUse = new HiddenHttpMethodFilter .HttpMethodRequestWrapper(request, method); } } } filterChain.doFilter((ServletRequest)requestToUse, response); }
3. 自定义 HiddenHttpMethodFilter: 参照 WebMvcAutoConfiguration 自定义 HiddenHttpMethodFilter:
1 2 3 4 5 6 7 8 9 @Configuration(proxyBeanMethods = false) public class WebConfig { @Bean public HiddenHttpMethodFilter hiddenHttpMethodFilter () { HiddenHttpMethodFilter hiddenHttpMethodFilter = new HiddenHttpMethodFilter (); hiddenHttpMethodFilter.setMethodParam("_m" ); return hiddenHttpMethodFilter; } }
表单现在只需添加一个 -m 参数,参数值为 PUT、DELETE、PATCH 其中一个,它就会去访问对应的请求方法了。
请求映射原理: SpringMvc 中通过 DispatcherServlet 做请求分发,SpringBoot 同理也一样。DispatcherServlet 是 Servlet 因此它肯定有 doGet 等方法。
DispatcherServlet 继承关系(idea 中 Ctrl+F12 查看):
1 DispatcherServlet -> FrameworkServlet -> HttpServletBean -> HttpServlet
FrameworkServlet 中重写了 doGet 等方法(idea 中 Ctrl+H 查看),并且可以发现 doGet 等方法都调用了 processRequest 方法它又调用了 doService 方法处理请求:
1 2 3 4 5 6 7 8 9 10 11 12 protected final void doGet (HttpServletRequest request, HttpServletResponse response) throws ServletException, IOException { this .processRequest(request, response); } protected final void processRequest (HttpServletRequest request, HttpServletResponse response) throws ServletException, IOException { try { this .doService(request, response); } } protected abstract void doService (HttpServletRequest request, HttpServletResponse response) throws Exception;
DispatcherServlet 中 doService 最终调用 doDispatch 方法派发请求:
1 2 3 4 5 6 protected void doDispatch (HttpServletRequest request, HttpServletResponse response) throws Exception { mappedHandler = this .getHandler(processedRequest); }
在 DispatcherServlet 中有一个 List<HandlerMapping> handlerMappings 参数它存储了许多请求的 映射处理器 HandlerMapping, getHandler 方法中它会遍历这些映射处理器,并获取到能够处理当前请求的 handler:
1 2 3 4 5 6 7 8 9 10 11 12 13 protected HandlerExecutionChain getHandler (HttpServletRequest request) throws Exception { if (this .handlerMappings != null ) { Iterator var2 = this .handlerMappings.iterator(); while (var2.hasNext()) { HandlerMapping mapping = (HandlerMapping)var2.next(); HandlerExecutionChain handler = mapping.getHandler(request); if (handler != null ) { return handler; } } } return null ; }
handlerMappings 中有一个 RequestMappingHandlerMapping 它保存了所有 @RequestMapping 相关和handler 的映射规则。还有 WelcomePageHandlerMapping 它就是欢迎页面 /index.html 的映射处理器,它们都是 WebMvcAutoConfiguration 中帮我们配置好的。
遍历时查询 HandlerMapping 中是否有对应处理请求的 handler,如果当前 HandlerMapping 中没有则继续在下一个 HandlerMapping 中寻找。
同理我们可以自定义映射处理器 HandlerMapping。
自定义 MVC:
SpringBoot 默认是关闭矩阵变量的 @MatrixVariable ,在 WebMvcAutoConfiguration 中 WebMvcAutoConfigurationAdapter 内有一个 configurePathMatch 方法它是来配置路径映射的我们需要修改一下路径路径匹配规则,而这个方法是通过 UrlPathHelper 对路径进行解析此类中有一个 removeSemicolonContent 默认为 true 表示移除 URL 路径分号的内容。
想开启矩阵变量功能,我们需要自定义 MVC SpringBoot 提供了三种方式:
@Configuration + 实现 WebMvcConfigurer 接口(推荐使用):
1 2 3 4 5 6 7 8 9 @Configuration(proxyBeanMethods = false) public class WebConfig implements WebMvcConfigurer { @Override public void configurePathMatch (PathMatchConfigurer configurer) { UrlPathHelper urlPathHelper = new UrlPathHelper (); urlPathHelper.setRemoveSemicolonContent(false ); configurer.setUrlPathHelper(urlPathHelper); } }
@Bean 注册 WebMvcConfigurer 组件:
1 2 3 4 5 6 7 8 9 10 11 12 13 14 @Configuration(proxyBeanMethods = false) public class WebConfig { @Bean public WebMvcConfigurer webMvcConfigurer () { return new WebMvcConfigurer () { @Override public void configurePathMatch (PathMatchConfigurer configurer) { UrlPathHelper urlPathHelper = new UrlPathHelper (); urlPathHelper.setRemoveSemicolonContent(false ); configurer.setUrlPathHelper(urlPathHelper); } }; } }
@Configuration + @EnableWebMvc + 继承 WebMvcConfigurer 全面接管 SpringMvc,慎用所有的规则需要手动重写配置。
@EnableWebMvc 会 @Import({DelegatingWebMvcConfiguration.class}) 引入组件 DelegatingWebMvcConfiguration 它继承 WebMvcConfigurationSupport ,而在 WebMvcAutoConfiguration 上表示 @ConditionalOnMissingBean(WebMvcConfigurationSupport.class) 则存在该类时 WebMvc 的自动配置将不生效。
参数处理原理:
在 Controller 方法中参数会按照类型或注解帮我们自动注入值,它是如何实现的?
1. 注解参数:
在 DispatcherServlet 的 doDispatch 方法中它通过 getHandler 找到能够处理当前请求的 HandlerMapping 从中拿到具体处理该请求的 Handler 它记录了具体的 Controller 方法。
getHandler 之后还会为当前的 Handler 找到 适配器 HandlerAdapter:
1 2 HandlerAdapter ha = this .getHandlerAdapter(mappedHandler.getHandler());
它会遍历适配器集合找到能够处理当前 Handler 的适配器:
1 2 3 4 5 6 7 8 9 10 11 12 13 14 private List<HandlerAdapter> handlerAdapters; protected HandlerAdapter getHandlerAdapter (Object handler) throws ServletException { if (this .handlerAdapters != null ) { Iterator var2 = this .handlerAdapters.iterator(); while (var2.hasNext()) { HandlerAdapter adapter = (HandlerAdapter)var2.next(); if (adapter.supports(handler)) { return adapter; } } } throw new ServletException ("No adapter for handler [" + handler + "]: The DispatcherServlet configuration needs to include a HandlerAdapter that supports this handler" ); }
在适配器集合中有一个 RequestMappingHandlerAdapter 它就是主要来处理 @RequestMaping 等方法的适配器。
找到适配器后执行目标方法:
1 2 mv = ha.handle(processedRequest, response, mappedHandler.getHandler());
在 RequestMappingHandlerAdapter 通过 invokeHandlerMethod 来执行我们的目标方法(Controller 方法)。
为将执行的方法设置 参数解析器 与 返回值处理器 :
1 2 3 4 5 6 7 8 9 10 11 12 13 14 ServletInvocableHandlerMethod invocableMethod = this .createInvocableHandlerMethod(handlerMethod);if (this .argumentResolvers != null ) { invocableMethod.setHandlerMethodArgumentResolvers(this .argumentResolvers); } if (this .returnValueHandlers != null ) { invocableMethod.setHandlerMethodReturnValueHandlers(this .returnValueHandlers); } invocableMethod.invokeAndHandle(webRequest, mavContainer, new Object [0 ]);
ServletInvocableHandlerMethod 中 invokeAndHandle 方法内:
1 2 Object returnValue = this .invokeForRequest(webRequest, mavContainer, providedArgs);
invokeForRequest 会利用 InvocableHandlerMethod 的 getMethodArgumentValues 方法中确定每一个参数的具体值:
1 2 3 4 5 6 7 8 9 10 11 12 13 14 15 16 17 18 19 20 21 22 23 24 25 26 27 28 29 30 31 32 33 34 35 36 37 protected Object[] getMethodArgumentValues(NativeWebRequest request, @Nullable ModelAndViewContainer mavContainer, Object... providedArgs) throws Exception { MethodParameter[] parameters = getMethodParameters(); if (ObjectUtils.isEmpty(parameters)) { return EMPTY_ARGS; } Object[] args = new Object [parameters.length]; for (int i = 0 ; i < parameters.length; i++) { MethodParameter parameter = parameters[i]; parameter.initParameterNameDiscovery(this .parameterNameDiscoverer); args[i] = findProvidedArgument(parameter, providedArgs); if (args[i] != null ) { continue ; } if (!this .resolvers.supportsParameter(parameter)) { throw new IllegalStateException (formatArgumentError(parameter, "No suitable resolver" )); } try { args[i] = this .resolvers.resolveArgument(parameter, mavContainer, request, this .dataBinderFactory); } catch (Exception ex) { if (logger.isDebugEnabled()) { String exMsg = ex.getMessage(); if (exMsg != null && !exMsg.contains(parameter.getExecutable().toGenericString())) { logger.debug(formatArgumentError(parameter, exMsg)); } } throw ex; } } return args; }
2. Servlet API 参数: Servlet 参数类型的解析器 ServletRequestMethodArgumentResolver 中:
1 2 3 4 5 6 7 8 9 10 public boolean supportsParameter (MethodParameter parameter) { Class<?> paramType = parameter.getParameterType(); return WebRequest.class.isAssignableFrom(paramType) || ServletRequest.class.isAssignableFrom(paramType) || MultipartRequest.class.isAssignableFrom(paramType) || HttpSession.class.isAssignableFrom(paramType) || pushBuilder != null && pushBuilder.isAssignableFrom(paramType) || Principal.class.isAssignableFrom(paramType) && !parameter.hasParameterAnnotations() || InputStream.class.isAssignableFrom(paramType) || Reader.class.isAssignableFrom(paramType) || HttpMethod.class == paramType || Locale.class == paramType || TimeZone.class == paramType || ZoneId.class == paramType; }
3. 复杂参数: Map、Model、ServletResponse 等类型参数。
以参数 Map 类型为例,在 InvocableHandlerMethod 的 getMethodArgumentValues 方法中:
获取到 Map 类型的参数解析器为 MapMethodProcessor 。
解析参数是利用 ModelAndViewContainer mavContainer 的 mavContainer.getModel() 返回 BindingAwareModelMap 它是 Model 也是 Map 类型,最终参数值封装到它里面。
ModelAndViewContainer 用来保存请求需要的所有数据,视图数据模型数据等等。
Model 类型参数解析器为 ModelMethodProcessor 过程同理一样调用了 mavContainer.getModel() 。
4. 自定义对象参数: 自定义 pojo 参数类型的解析器 ServletModelAttributeMethodProcessor 它继承 ModelAttributeMethodProcessor 。
由之前可知 resolvers.supportsParameter(parameter) 来判断某解析器是否能解析该类型参数:
1 2 3 4 5 public boolean supportsParameter (MethodParameter parameter) { return (parameter.hasParameterAnnotation(ModelAttribute.class) || (this .annotationNotRequired && !BeanUtils.isSimpleProperty(parameter.getParameterType()))); }
同列解析参数 resolvers.resolveArgument(...) ,再ModelAttributeMethodProcessor 的 resolveArgument 方法中:
1 2 3 4 5 6 7 8 9 10 11 12 13 14 15 16 17 18 19 20 21 22 23 24 25 26 27 28 29 30 31 32 33 34 35 36 37 38 39 40 41 42 43 44 45 46 47 public final Object resolveArgument (MethodParameter parameter, @Nullable ModelAndViewContainer mavContainer, NativeWebRequest webRequest, @Nullable WebDataBinderFactory binderFactory) throws Exception { String name = ModelFactory.getNameForParameter(parameter); ModelAttribute ann = parameter.getParameterAnnotation(ModelAttribute.class); if (ann != null ) { mavContainer.setBinding(name, ann.binding()); } Object attribute = null ; BindingResult bindingResult = null ; if (mavContainer.containsAttribute(name)) { attribute = mavContainer.getModel().get(name); } else { try { attribute = createAttribute(name, parameter, binderFactory, webRequest); } catch (BindException ex) { if (isBindExceptionRequired(parameter)) { throw ex; } if (parameter.getParameterType() == Optional.class) { attribute = Optional.empty(); } else { attribute = ex.getTarget(); } bindingResult = ex.getBindingResult(); } } if (bindingResult == null ) { WebDataBinder binder = binderFactory.createBinder(webRequest, attribute, name); if (binder.getTarget() != null ) { if (!mavContainer.isBindingDisabled(name)) { bindRequestParameters(binder, webRequest); } validateIfApplicable(binder, parameter); if (binder.getBindingResult().hasErrors() && isBindExceptionRequired(binder, parameter)) { throw new BindException (binder.getBindingResult()); } } if (!parameter.getParameterType().isInstance(attribute)) { attribute = binder.convertIfNecessary(binder.getTarget(), parameter.getParameterType(), parameter); } bindingResult = binder.getBindingResult(); } Map<String, Object> bindingResultModel = bindingResult.getModel(); mavContainer.removeAttributes(bindingResultModel); mavContainer.addAllAttributes(bindingResultModel); return attribute; }
WebDataBinder : web 数据绑定器,将请求参数的值绑定到指定的 JavaBean 中,它利用 Container 转换器,将请求数据转换成指定的数据类型再次封装到 JavaBean 中。
GenericConversionService :在设置每一个值的时候,找它里面的所有 Converter 那个可以将这个数据类型(request带来参数的字符串)转换到指定的类型。
自定义 Converter: Converter 接口 @FunctionalInterface public interface Converter<S, T> 包含 FunctionalInterface 注解,它只能针对 form 表单提交数据有效。
1 2 3 4 5 6 7 8 9 10 11 12 13 14 15 16 17 18 19 20 21 22 23 @Configuration(proxyBeanMethods = false) public class WebConfig { @Bean public WebMvcConfigurer webMvcConfigurer () { return new WebMvcConfigurer () { @Override public void addFormatters (FormatterRegistry registry) { registry.addConverter(new Converter <String, Car>() { @Override public Car convert (String source) { if (StringUtils.hasText(source)){ Car car = new Car (); car.setName(source); return car; } return null ; } }); } }; } }
例如发起请求:/setUser?name=userName&car=myCar 与 /setCar?car=111
1 2 3 4 5 6 7 8 @RequestMapping("setUser") public User setUser (User user) { return user; } @RequestMapping("setCar") public Car setUser (@RequestParam("car") Car car) { return car; }
数据响应原理: 1. 响应 JSON:
由上可知 ServletInvocableHandlerMethod 的 invokeAndHandle 中会拿到 Controller 的返回值,之后它还会对返回值做处理:
1 2 3 4 5 6 7 8 9 10 11 12 13 14 15 16 17 18 19 20 public void invokeAndHandle (ServletWebRequest webRequest, ModelAndViewContainer mavContainer, Object... providedArgs) throws Exception { Object returnValue = this .invokeForRequest(webRequest, mavContainer, providedArgs); this .setResponseStatus(webRequest); if (returnValue == null ) { if (this .isRequestNotModified(webRequest) || this .getResponseStatus() != null || mavContainer.isRequestHandled()) { this .disableContentCachingIfNecessary(webRequest); mavContainer.setRequestHandled(true ); return ; } } else if (StringUtils.hasText(this .getResponseStatusReason())) { mavContainer.setRequestHandled(true ); return ; } try { this .returnValueHandlers.handleReturnValue(returnValue, this .getReturnValueType(returnValue), mavContainer, webRequest); } catch (Exception var6) { } }
HandlerMethodReturnValueHandlerComposite 中:
1 2 3 4 5 6 7 8 public void handleReturnValue (@Nullable Object returnValue, MethodParameter returnType, ModelAndViewContainer mavContainer, NativeWebRequest webRequest) throws Exception { HandlerMethodReturnValueHandler handler = selectHandler(returnValue, returnType); if (handler == null ) { throw new IllegalArgumentException ("Unknown return value type: " + returnType.getParameterType().getName()); } handler.handleReturnValue(returnValue, returnType, mavContainer, webRequest); }
返回值处理器接口 HandlerMethodReturnValueHandler :
1 2 3 4 5 6 7 public interface HandlerMethodReturnValueHandler { boolean supportsReturnType (MethodParameter returnType) ; void handleReturnValue (@Nullable Object returnValue, MethodParameter returnType, ModelAndViewContainer mavContainer, NativeWebRequest webRequest) throws Exception;}
1 2 3 4 5 6 7 8 9 10 11 12 13 14 15 16 ModelAndView Model View ResponseEntity ResponseBodyEmitter StreamingResponseBody HttpEntity HttpHeaders Callable DeferredResult ListenableFuture CompletionStage WebAsyncTask @ModelAttribute @ResponseBody --> RequestResponseBodyMethodProcessor
RequestResponseBodyMethodProcessor 处理 @ResponseBody 标注的方法的返回值:
RequestResponseBodyMethodProcessor 在 handleReturnValue 调用 writeWithMessageConverters 方法使用消息转换器(MessageConverters)进行写出操作:
内容协商:
Http 协议中规定请求头中有 Accept 属性它告诉服务器,客户端能接收的响应类型是什么。
1 2 Accept: text/html, application/xhtml+xml, application/xml;q=0.9 , image/webp, image/apng, *
客户端能接收的类型 用 MediaType 媒体类型 对象表示,与 服务器支持生成的类型 循环匹配筛选出能够支持类型的 MediaType 。若客户端无法解析服务端返回的内容,即媒体类型未匹配,那么响应 406。
SpringMvc 遍历容器中所有 HttpMessageConverter 消息转换器,找到支持相应类型的转换器:
主要作用:看是否支持将返回值 Class 类型的对象,转化为 MediaType 类型的数据
1 2 3 4 5 6 7 8 9 10 public interface HttpMessageConverter <T> { boolean canRead (Class<?> clazz, @Nullable MediaType mediaType) ; boolean canWrite (Class<?> clazz, @Nullable MediaType mediaType) ; List<MediaType> getSupportedMediaTypes () ; default List<MediaType> getSupportedMediaTypes (Class<?> clazz) { return (canRead(clazz, null ) || canWrite(clazz, null ) ? getSupportedMediaTypes() : Collections.emptyList()); } T read (Class<? extends T> clazz, HttpInputMessage inputMessage) throws IOException, HttpMessageNotReadableException; void write (T t, @Nullable MediaType contentType, HttpOutputMessage outputMessage) throws IOException, HttpMessageNotWritableException; }
利用 MappingJackson2HttpMessageConverter 中 write 方法将对象转为 JSON (利用 Jackson)再写出去。
2. 内容协商原理:
判断当前请求头中是否已经有确定的媒体类型 MediaType ,有就使用确定好的媒体类型,没有则向下执行。
获取客户端支持接收的内容类型(默认通过请求头 Accept 字段) acceptableTypes = this.getAcceptableMediaTypes(request)。
ContentNegotiationManager 内容协商管理器 默认使用基于请求头的策略HeaderContentNegotiationStrategy 确定客户端可以接收的内容类型
获取服务器支持生成的媒体类型,再与客户端能接收的类型进行比对找到匹配的媒体类型。
遍历循环容器中所有的 HttpMessageConverter ,拿到 所有支持转换 当前返回值 Class 类型的 HttpMessageConverter。
客户端想要的类型和服务器支持的类型进行循环匹配。
最终使用匹配到的 Converter 进行转换。
3. 开启浏览器参数方式内容协商功能:
开启此配置后服务器不再默认通过请求头的 Accept 字段来获取客户端支持接收的内容类型,而是通过读取请求参数中的 format 值来确定客户端接收的内容类型。
1 2 3 4 spring: mvc: contentnegotiation: favor-parameter: true
请求时添加 format 参数指定接收的数据类型即可
/user?format=json 接收 JSON 类型数据
自定义 HttpMessageConverter:
自定义 HttpMessageConverter:
1 2 3 4 5 6 7 8 9 10 11 12 13 14 15 16 17 18 19 20 21 22 23 24 25 26 27 28 29 30 31 32 33 34 35 36 37 38 @Bean public WebMvcConfigurer webMvcConfigurer () { return new WebMvcConfigurer () { @Override public void extendMessageConverters (List<HttpMessageConverter<?>> converters) { converters.add(new HttpMessageConverter <User>() { @Override public boolean canRead (Class<?> clazz, MediaType mediaType) { return false ; } @Override public boolean canWrite (Class<?> clazz, MediaType mediaType) { return clazz.isAssignableFrom(User.class); } @Override public List<MediaType> getSupportedMediaTypes () { return MediaType.parseMediaTypes("application/x-user" ); } @Override public User read (Class<? extends User> clazz, HttpInputMessage inputMessage) throws IOException, HttpMessageNotReadableException { return null ; } @Override public void write (User user, MediaType contentType, HttpOutputMessage outputMessage) throws IOException, HttpMessageNotWritableException { String data = user.getName()+ " -> " +user.getAge(); OutputStream body = outputMessage.getBody(); body.write(data.getBytes(StandardCharsets.UTF_8)); } }); } }; }
当标注 @ResponseBody 的方法返回值类型为 User 且媒体类型为我们自定义的 application/x-user 时将使用此自定义 HttpMessageConverter 写出响应数据。
如果还想使用请求中添加 format 参数来指定客户端接收响应数据的类型,还需要在上 WebMvcConfigurer 中重写 configureContentNegotiation 方法(原来的策略全部失效):
1 2 3 4 5 6 7 8 9 10 11 12 13 14 15 @Override public void configureContentNegotiation (ContentNegotiationConfigurer configurer) { Map<String, MediaType> mediaTypes = new HashMap <>(); mediaTypes.put("json" , MediaType.APPLICATION_JSON); mediaTypes.put("xml" , MediaType.APPLICATION_XML); mediaTypes.put("user" , MediaType.parseMediaType("application/x-user" )); ParameterContentNegotiationStrategy strategy = new ParameterContentNegotiationStrategy (mediaTypes); configurer.strategies(Arrays.asList(strategy)); }
1 2 3 4 5 6 spring: mvc: contentnegotiation: favor-parameter: true media-types: { user: application/x-user }
这样我们只需在请求中添加 format=user 则表示客户端需要接收的类型为 application/x-user 类型。
视图解析 Thymeleaf 模板:
现代化、服务端 Java 模板引擎
Thymeleaf 官网:https://www.thymeleaf.org/
Thymeleaf 使用与语法
1. 引入 Starter: 1 2 3 4 5 <dependency > <groupId > org.springframework.boot</groupId > <artifactId > spring-boot-starter-thymeleaf</artifactId > </dependency >
2. Thymeleaf 使用:
SpringBoot 默认帮我们配置好了 Thymeleaf:
1 2 3 4 5 @AutoConfiguration( after = {WebMvcAutoConfiguration.class, WebFluxAutoConfiguration.class} ) @EnableConfigurationProperties({ThymeleafProperties.class}) @ConditionalOnClass({TemplateMode.class, SpringTemplateEngine.class}) @Import({ReactiveTemplateEngineConfiguration.class, DefaultTemplateEngineConfiguration.class}) public class ThymeleafAutoConfiguration {...}
默认在 resources/templates/ 文件夹内的 .html 页面文件将会被 Thymeleaf 模板引擎解析。
1 2 3 4 5 6 @ConfigurationProperties( prefix = "spring.thymeleaf" ) public class ThymeleafProperties { public static final String DEFAULT_PREFIX = "classpath:/templates/" ; public static final String DEFAULT_SUFFIX = ".html" ; ... }
Thymeleaf 模版页面中的 html 标签上需要声明 Thymeleaf 的命名空间:
1 <html lang ="en" xmlns:th ="http://www.thymeleaf.org" >
视图解析原理:
SpringMvc 处理返回值时,当返回值是一个字符串时会被 ViewNameMethodReturnValueHandler 处理器处理:
1 2 3 4 5 6 7 8 9 10 11 12 13 14 15 16 17 18 19 20 21 22 public class ViewNameMethodReturnValueHandler implements HandlerMethodReturnValueHandler { public boolean supportsReturnType (MethodParameter returnType) { Class<?> paramType = returnType.getParameterType(); return Void.TYPE == paramType || CharSequence.class.isAssignableFrom(paramType); } public void handleReturnValue (@Nullable Object returnValue, MethodParameter returnType, ModelAndViewContainer mavContainer, NativeWebRequest webRequest) throws Exception { if (returnValue instanceof CharSequence) { String viewName = returnValue.toString(); mavContainer.setViewName(viewName); if (this .isRedirectViewName(viewName)) { mavContainer.setRedirectModelScenario(true ); } } else if (returnValue != null ) { throw new UnsupportedOperationException ("Unexpected return type: " + returnType.getParameterType().getName() + " in method: " + returnType.getMethod()); } } protected boolean isRedirectViewName (String viewName) { return viewName.startsWith("redirect:" ) || PatternMatchUtils.simpleMatch(this .redirectPatterns, viewName); } }
Controller 方法的参数是一个 自定义类型对象 时会默认 自动将它存放在 ModelAndViewContainer 中。
任何目标方法执行完成以后都会返回 ModelAndView (数据与视图)。
当你的 ModelAndView 没有设置 viewName 时是给你使用默认的 viewName(值为当前 Controller 方法的请求路径,如 RquestMapping(“login”) 那么视图就是 login)。
由 DispatcherServlet 的 processDispatchResult 方法处理派发结果(处理页面该如何响应)。
它会执行 render(mv, request, response) 渲染页面操作,遍历所有 ViewResolver 找到对应视图解析器得到相应的 View 对象(定义了页面渲染逻辑,如重定向是 RedirectView ),最后调用 View 的 render 方法进行页面渲染工作。
返回值以 forward 开头:InternalResourceView 中 request 原生转发请求
返回值以 redirect 开头:RedirectView 中 request 原生重定向请求
普通字符串:new ThymeleafView()
拦截器 HandlerInterceptor:
拦截器 HandlerInterceptor 接口:
1 2 3 4 5 6 7 8 9 10 public interface HandlerInterceptor { default boolean preHandle (HttpServletRequest request, HttpServletResponse response, Object handler) throws Exception { return true ; } default void postHandle (HttpServletRequest request, HttpServletResponse response, Object handler, @Nullable ModelAndView modelAndView) throws Exception {} default void afterCompletion (HttpServletRequest request, HttpServletResponse response, Object handler, @Nullable Exception ex) throws Exception {} }
使用拦截器:
实现 HandlerInterceptor :
1 2 3 4 5 6 7 8 9 10 11 public class LoginInterceptor implements HandlerInterceptor { @Override public boolean preHandle (HttpServletRequest request, HttpServletResponse response, Object handler) throws Exception { HttpSession session = request.getSession(); Object user = session.getAttribute("user" ); if (user != null ) return true ; request.setAttribute("msg" , "请登录" ); request.getRequestDispatcher("/success" ).forward(request, response); return false ; } }
配置拦截器:
1 2 3 4 5 6 7 8 9 10 11 12 @Configuration public class WebConfig implements WebMvcConfigurer { @Override public void addInterceptors (InterceptorRegistry registry) { registry.addInterceptor(new LoginInterceptor ()) .addPathPatterns("/**" ) .excludePathPatterns("/" ,"/login" , "/css/**" ,"/html/**" ,"/images/**" ); } }
拦截器原理:
根据当前请求,找到 mappedHandler 为 HandlerExecutionChain 它拿到了可以处理请求的 Handler 和相关的拦截器。
之后拿到了相关的适配器(HandlerAdapter),最后使用适配器来执行目标方法。但在执行目标方法之前还有一个前置步骤 applyPreHandle 它会来执行我们拦截器的 preHandle 方法:
1 if (!mappedHandler.applyPreHandle(processedRequest, response)) { return ; }
applyPreHandle 会先 正序 挨个执行拦截器的 preHandle 方法,如果当前拦截器返回 true 这执行下一个。如果拦截器 preHandle 返回 false 会执行 triggerAfterCompletion 方法,它会 逆序 执行 已经触发了的拦截器 的 afterCompletion 方法,并且 applyPreHandle 返回 false。
因此如果任何一个拦截器返回 false ,则 applyPreHandle 返回 false 将直接 return 不能执行目标方法。
如果成功执行了目标方法,之后还会 倒序 执行所有拦截器的 postHandle 方法:
1 mappedHandler.applyPostHandle(processedRequest, response, mv);
并且注意 前任何步骤报错 都将执行 triggerAfterCompletion 方法。
最后在页面渲完成以后,也会触发 triggerAfterCompletion 方法。
文件上传: 文件上传:
表单设置 method="post" 与 enctype="multipart/form-data" :
1 2 3 4 <form action="/upload" method="post" enctype="multipart/form-data" > file: <input type="file" name="file" id="file" > <br/> <button type="submit" > 提交 </button> </form>
接收文件:
1 2 3 4 5 6 7 8 9 @PostMapping("upload") public String upload ( @RequestPart("file") MultipartFile file ) throws IOException { if (!file.isEmpty()){ String fileName = file.getOriginalFilename(); File saveFile = new File ("C:\\Users" , UUID.randomUUID() + fileName); file.transferTo(saveFile); } return "success" ; }
@RequestParam 也能接收 MultipartFile 类型,一般接收基本类型和 String。
@RequestPart 一般接收 multipart/form-data 表单数据,适用于复杂的请求域像 JSON,XML。
相关配置(MultipartAutoConfiguration.class):
1 2 3 4 # 上传单个文件大小上限 spring.servlet.multipart.max-file-size=10MB # 整个请求的大小上限 spring.servlet.multipart.max-request-size=100MB
原理解析:
SpringBoot 对文件上传的自动配置封装在了 MultipartAutoConfiguration 中,它自动帮我们配置了 StandardServletMultipartResolver 文件上传解析器。
在 DispatcherServlet 的 doDispatch 中获取 mappedHandler 处理器之前会先解析请求是否是上传文件请求(根据请求类型是否是 multipart/ 来判断)。
如果是文件上传请求,文件上传解析器会将 原生请求(request) 封装为 MultipartHttpServletRequest 继续向下执行。
最终参数解析器将请求中的文件内容封装成 MultipartFile 。
错误处理: 默认机制:
默认情况下 SpringBoot 提供 /error 处理所有错误映射,如果是浏览器会响应一个 Whitelabel 的 HTML 视图,其它客户端会生产 JSON 响应。
在任何静态资源文件夹中 error/ 目录下以 4xx 或 5xx 开头页面会在发生相应错误时被自动解析并返回。
自定义异常处理:
@ControllerAdvice + @ExceptionHandler 处理全局异常:
1 2 3 4 5 6 7 8 @ControllerAdvice public class GlobalExceptionHandler { @ExceptionHandler({ NullPointerException.class, ArithmeticException.class }) public String handlerException ( Exception e ) { return "" ; } }
@ResponseStatus 自定义异常:
1 2 3 @ResponseStatus(value = HttpStatus.BAD_REQUEST, reason = "请求错误") public class UserException extends RuntimeException {}
HandlerExceptionResolver 自定义异常解析器:
因为我们自定义异常解析器的组件创建会比它默认的解析器后创建,而一般异常都被默认的解析器处理了轮不到我们自定义的解析器,因此我们需要提升自定义解析器创建的优先级。
1 2 3 4 5 6 7 8 9 10 11 @Order(value = Ordered.HIGHEST_PRECEDENCE) @Component public class CustomerExceptionResolver implements HandlerExceptionResolver { @Override public ModelAndView resolveException (HttpServletRequest request, HttpServletResponse response, Object handler, Exception ex) { return new ModelAndView ("404" ); } }
异常处理原理:
ErrorMvcAutoConfiguration 自动配置了异常处理规则,给容器中存放了一些组件 errorAttributes( DefaultErrorAttributes.class ) 组件。
1 DefaultErrorAttributes implements ErrorAttributes , HandlerExceptionResolver
ErrorAttributes 定义了错误页面中包含的数据。
basicErrorController( BasicErrorController ) 组件,默认处理 /error 请求。
1 2 3 @RequestMapping("${server.error.path:${error.path:/error}}") public class BasicErrorController extends AbstractErrorController
其中返回 HTML 页面的请求方法会返回 ModelAndView("error", model) ,通过 BeanNameViewResolver 视图解析器,按照 视图名作为组件的 ID 去容器中寻找 ID 为 error 的 View 组件 。(还有一个返回 JSON 的请求方法)
conventionErrorViewResolver( DefaultErrorViewResolver )组件,发生错误它会以 Http 状态码 作为视图名(404、4XX、5XX)。
异常处理流程:
doDispatch 中执行目标方法期间发生任何异常都被 catch 捕获并将异常对象保存到 Object dispatchException 中。
在执行 processDispatchResult 视图解析时将处理异常,由 processHandlerException 方法处理 handler 发生的异常并返回 ModelAndView。它会遍历所有的 HandlerExceptionResolver 处理器异常解析器看谁能够处理当前异常。
默认是没有能够处理异常的解析器其中 DefaultErrorAttributes 只会将错误信息保存到请求域中,其它的解析器只在特定的情况发挥作用(如有 @ExceptionHandler 注解等)。
如果没有任何解析器能够处理当前异常最终将发送 /error 请求,并被 BasicErrorController 中的方法处理。它将遍历所有的 ErrorViewResolver 错误视图解析器其中 DefaultErrorViewResolver 将返回错误页面视图。
web 原生组件: 注意原生组件不会触发 SpringBoot 的拦截器等功能。
@ServletComponentScan:
在主类中使用 @ServletComponentScan 指定 servlet、Filter、Listener 组件存放的包位置:
默认将扫描并注入此注解所在包以及所有子类包中含有 @WebServlet 、 @WebFilter 、 @WebListener 注解的原生组件,basePackages 属性指定扫描的包位置。
1 2 3 4 @ServletComponentScan(basePackages = "top.ruoxijun.servlet") @SpringBootApplication public class MainApplication {...
在 @ServletComponentScan 注解能扫描的包内创建原生 servlet 即可:
1 2 3 4 5 6 7 @WebServlet(urlPatterns = "/my") public class MyServlet extends HttpServlet { @Override protected void doGet (HttpServletRequest req, HttpServletResponse resp) throws ServletException, IOException { resp.getWriter().write("this is MyServlet.class" ); } }
同理 Filter :
1 2 3 4 5 6 7 8 9 10 @WebFilter(urlPatterns = "/css/*") public class MyFilter implements Filter { @Override public void init (FilterConfig filterConfig) throws ServletException {} @Override public void doFilter (ServletRequest servletRequest, ServletResponse servletResponse, FilterChain filterChain) throws IOException, ServletException {} @Override public void destroy () { Filter.super .destroy(); } }
Listener:
1 2 3 4 5 6 7 @WebListener public class MyListener implements ServletContextListener { @Override public void contextInitialized (ServletContextEvent sce) {} @Override public void contextDestroyed (ServletContextEvent sce) {} }
xxxRegistrationBean: 推荐使用在配置类中向 SpringBoot 注入 ServletRegistrationBean 、 FilterRegistrationBean 、 ServletListenerRegistrationBean 类型组件的方式来分别添加 servlet、Filter、Listener:
1 2 3 4 5 6 7 8 9 10 11 12 13 14 15 16 17 18 19 20 21 22 23 24 25 26 27 @Configuration public class MyRegistrationBean { @Bean public ServletRegistrationBean myServlet () { MyServlet myServlet = new MyServlet (); return new ServletRegistrationBean (myServlet, "/my" ); } @Bean public FilterRegistrationBean myFilter () { MyFilter myFilter = new MyFilter (); FilterRegistrationBean<MyFilter> filterRegistrationBean = new FilterRegistrationBean <>(myFilter); filterRegistrationBean.setUrlPatterns(Arrays.asList("/css/*" )); return filterRegistrationBean; } @Bean public ServletListenerRegistrationBean myListener () { MyListener myListener = new MyListener (); return new ServletListenerRegistrationBean (myListener); } }
DispatcherServlet 实现原理:
在 DispatcherServletAutoConfiguration 中给容器配置并注入了 dispatcherServlet 组件,且属性绑定在 WebMvcProperties 中对应的配置项为 spring.mvc。
其中另一个配置类中给容器配置注入了 DispatcherServletRegistrationBean 组件,它继承至 ServletRegistrationBean<DispatcherServlet> ,且配置器映射路径为 / (对应配置: spring.mvc.servlet.path )。
context-path 配置项目上下文访问的前缀,path 配置的是 dispatcherServlet 拦截的路径。
多个 servlet 处理同一层路径采用精确优先原则(如有 /my/ 与 /my/2 两个 servlet ,/my/1将进入第1个)。
由于 SpringBoot 的 web 都基于 dispatcherServlet 的 / 实现,因此我们自定义注入的原生 web 组件是直接执行,不会通过 SpringBoot 的相关功能(如拦截器)。
嵌入式 Servlet 容器: 原理:
在 spring-boot-starter-web 包中默认引入 Tomcat 的包。
配置类 ServletWebServerFactoryAutoConfiguration 它导入了 ServletWebServerFactoryConfiguration 组件其中它会根据添加动态判断系统导入了那个 web 服务器的包,注入相应的服务器工厂组件( TomcatServletWebServerFactory 、 JettyServletWebServerFactory 、 UndertowServletWebServerFactory )。
ServletWebServerApplicationContext 它会在容器启动时寻找 ServletWebServerFactory (servlet web 服务器工厂),利用服务器工厂创建除服务器并启动。
切换或去除嵌入式服务器:
在 pom.xml 中引入 web 包时排除 Tomcat 依赖的包:
1 2 3 4 5 6 7 8 <dependency > <groupId > org.springframework.boot</groupId > <artifactId > spring-boot-starter-web</artifactId > <exclusions > <groupId > org.springframework.boot</groupId > <artifactId > spring-boot-starter-tomcat</artifactId > </exclusions > </dependency >
引入你需要的服务器包,SpringBoot 已配置好版本号不需要填写版本号直接引入即可。
数据校验
1 2 3 4 5 6 7 <dependency > <groupId > org.springframework.boot</groupId > <artifactId > spring-boot-starter-validation</artifactId > <version > 2.5.4</version > </dependency >
1 2 3 4 5 @Validated public class Person { @Email(message="邮箱格式错误") private String name; }
注解
验证的数据类型
说明
@AssertFalse
Boolean,boolean
值必须是false
@AssertTrue
Boolean,boolean
值必须是true
@NotNull
任意类型
值不能是null
@Null
任意类型
值必须是null
@Min
BigDecimal、BigInteger、byte、short、int、long、double 以及任何Number或CharSequence子类型
大于等于@Min指定的值
@Max
同上
小于等于@Max指定的值
@DecimalMin
同上
大于等于@DecimalMin指定的值(超高精度)
@DecimalMax
同上
小于等于@DecimalMax指定的值(超高精度)
@Digits
同上
限制整数位数和小数位数上限
@Size
字符串、Collection、Map、数组等
长度在指定区间之内,如字符串长度、集合大小等
@Past
如 java.util.Date, java.util.Calendar 等日期类型
值必须比当前时间早
@Future
同上
值必须比当前时间晚
@NotBlank
CharSequence及其子类
值不为空,在比较时会去除字符串的首位空格
@Length
CharSequence及其子类
字符串长度在指定区间内
@NotEmpty
CharSequence及其子类、Collection、Map、数组
值不为null且长度不为空(字符串长度不为0,集合大小不为0)
@Range
BigDecimal、BigInteger、CharSequence、byte、short、int、long 以及原子类型和包装类型
值在指定区间内
@Email
CharSequence及其子类
值必须是邮件格式
@Pattern
CharSequence及其子类
值需要与指定的正则表达式匹配
@Valid
任何非原子类型
用于验证对象属性
Swagger
Swagger官网:https://swagger.io/
RestFul API 文档在线生成工具
可直接运行,支持在线测试
1. swagger 2 版:
1 2 3 4 5 6 7 8 9 10 11 12 13 <dependency > <groupId > io.springfox</groupId > <artifactId > springfox-swagger2</artifactId > <version > 2.9.2</version > </dependency > <dependency > <groupId > io.springfox</groupId > <artifactId > springfox-swagger-ui</artifactId > <version > 2.9.2</version > </dependency >
请产考下方swagger3 配置 ,swagger2 启动依赖为 @EnableSwagger2 ,文档类型为DocumentationType.SWAGGER_2 其它使用无太大变化。
浏览器访问地址为: 项目地址/swagger-ui.html
2. swagger 3 版:
1 2 3 4 5 6 <dependency > <groupId > io.springfox</groupId > <artifactId > springfox-boot-starter</artifactId > <version > 3.0.0</version > </dependency >
1 2 3 4 5 6 7 8 9 10 11 12 13 14 15 16 17 18 19 20 21 22 23 24 25 26 27 28 29 30 31 32 33 34 35 36 37 38 39 40 41 42 43 44 45 46 47 @Configuration @EnableOpenApi public class SwaggerConfig { @Bean public Docket docket () { return new Docket (DocumentationType.OAS_30) .apiInfo(apiInfo()) .enable(true ) .groupName("分组1" ) .select() .apis(RequestHandlerSelectors.basePackage("ruoxijun.cn" )) .paths(PathSelectors.ant("/find**" )) .build(); } private ApiInfo apiInfo () { Contact contact = new Contact ( "ruoxijun" , "http://ruoxijun.cn/" , "1460662245@qq.com" ); return new ApiInfo ( "项目 Api 标题" , "项目 Api 描述" , "1.0" , "http://ruoxijun.cn/" , contact, "Apache 2.0" , "http://www.apache.org/licenses/LICENSE-2.0" , new ArrayList ()); } @Bean public Docket docket2 () { return new Docket (DocumentationType.SWAGGER_2) .groupName("分组2" ); } }
浏览器访问地址为: 项目地址/swagger-ui/index.html
3.常用注解:
conllection 类常用注解:
1 2 3 4 5 6 7 8 9 10 11 12 @Api(tags = "conllection 类说明") @ApiOperation(value = "请求方法作用",notes = "请求方法备注说明") @ApiImplicitParams({ // 方法参数集,required 表示参数是否必须 @ApiImplicitParam(name = "参数名",value = "参数描述",required = true), @ApiImplicitParam(name = "v",value = "value值",required = true) }) @ApiResponses({ // 方法响应 code 描述,response 抛出的异常类 @ApiResponse(code = 200,message = "返回数据成功"), @ApiResponse(code = 400,message = "返回数据失败",response = ParamsException.class) })
实体类常用注解:
1 2 @ApiModel("用户实体类") @ApiModelProperty("用户id")
跨域 1 2 3 4 5 6 7 8 9 10 11 12 13 14 15 16 17 18 @Configuration public class CorsConfig implements WebMvcConfigurer { @Override public void addCorsMappings (CorsRegistry registry) { registry.addMapping("/**" ) .allowedOriginPatterns("*" ) .allowCredentials(true ) .allowedMethods("GET" , "POST" , "DELETE" , "PUT" ) .allowedHeaders("*" ) .maxAge(3600 ); } }
数据库开发 JDBC: 1. 添加依赖: 1 2 3 4 5 6 7 8 9 10 11 12 <dependency > <groupId > org.springframework.boot</groupId > <artifactId > spring-boot-starter-jdbc</artifactId > </dependency > <dependency > <groupId > mysql</groupId > <artifactId > mysql-connector-java</artifactId > </dependency >
在 spring-boot-starter-jdbc 中引入了 HikariDataSource 数据源(数据库连接池)、jdbc、spring 事务包,因此我们需要操作什么数据库导入相应驱动即可。
SpringBoot 默认数据库驱动版本一般与本机数据库版本不一致,建议修改版本配置与本机一致:
1 2 3 <properties > <mysql.version > 8.0.20</mysql.version > </properties >
2. 数据库配置: 自动配置分析:
DataSourceAutoConfiguration 数据源自动配置
数据源相关属性都与 DataSourceProperties 绑定,对应配置 spring.datasource 的相关属性。
数据库连接池默认的配置在我们没有配置 DataSource 时才会自动配置,且默认配置使用 HikariDataSource 连接池。
DataSourceTransactionManagerAutoConfiguration 事务管理器自动配置
数据库相关配置: 1 2 3 4 5 6 7 spring: datasource: driver-class-name: com.mysql.cj.jdbc.Driver url: jdbc:mysql://localhost:3306/ssm_crud?useSSL=false&useUnicode=true&characterEncoding=utf8&serverTimezone=GMT%2B8 username: root password: 88888888
3. 测试使用: 1 2 3 4 5 6 7 8 9 10 11 @Slf4j @SpringBootTest public class SpringBoot01Test { @Autowired JdbcTemplate jdbcTemplate; @Test public void dataSourceTest () { List<Map<String, Object>> maps = jdbcTemplate.queryForList("select * from book" ); log.info("查询结果 {} " , maps); } }
Druid:
项目官方地址:https://github.com/alibaba/druid
官方介绍:Druid 是 Java 语言中最好的数据库连接池,Druid 能够提供强大的监控和扩展功能。
1. 使用 druid: 1. 引入依赖: 1 2 3 4 5 6 7 8 9 10 11 12 13 14 <dependency > <groupId > com.alibaba</groupId > <artifactId > druid</artifactId > <version > 1.2.14</version > </dependency > <dependency > <groupId > log4j</groupId > <artifactId > log4j</artifactId > <version > 1.2.17</version > </dependency >
2. 配置 druid: 1 2 3 4 5 6 7 8 spring: datasource: driver-class-name: com.mysql.cj.jdbc.Driver url: jdbc:mysql://localhost:3306/springboot-vue-manage?useSSL=false&useUnicode=true&characterEncoding=utf8&serverTimezone=GMT%2B8 username: root password: 88888888 filters: stat,wall
要使用 druid 数据源,由前可知需要注入 druid 的 DataSource 来使默认的数据源失效(也支持配置文件中 spring.dataSource.type 属性配置数据源)。
想要开启 druid 监控与统计数据的页面需要配置 StatViewServlet 。
页面开启后 DruidDataSource 中配置 filters 属性开启各类监控,值 stat 开启 SQL 监控,值 wall 开启 SQL 防火墙。
配置 WebStatFilter 可开启 web 监控,并设置统计和需要排除的请求。
1 2 3 4 5 6 7 8 9 10 11 12 13 14 15 16 17 18 19 20 21 22 23 24 25 26 27 28 29 30 31 32 33 @Configuration public class DruidConfiguration { @ConfigurationProperties("spring.datasource") @Bean public DataSource dataSource () { DruidDataSource dataSource = new DruidDataSource (); return dataSource; } @Bean public ServletRegistrationBean statViewServlet () { StatViewServlet viewServlet = new StatViewServlet (); ServletRegistrationBean<StatViewServlet> registrationBean = new ServletRegistrationBean <>(viewServlet, "/druid/*" ); registrationBean.addInitParameter("loginUsername" , "admin" ); registrationBean.addInitParameter("loginPassword" , "admin" ); return registrationBean; } @Bean public FilterRegistrationBean webStatFilter () { WebStatFilter webStatFilter = new WebStatFilter (); FilterRegistrationBean<WebStatFilter> registrationBean = new FilterRegistrationBean <>(webStatFilter); registrationBean.setUrlPatterns(Arrays.asList("/*" )); registrationBean.addInitParameter("exclusions" , "*.js,*.gif,*.jpg,*.png,*.css,*.ico,/druid/*" ); return registrationBean; } }
在浏览器中访问 项目地址/druid 或 项目地址/druid/login.html 即可查看监控页面。
2. druid starter: 1. 引入 druid 的 starter: 1 2 3 4 5 6 <!-- https: <dependency> <groupId>com.alibaba</groupId> <artifactId>druid-spring-boot-starter</artifactId> <version>1.2 .14 </version> </dependency>
除了引入 druid 包手动配置以外,druid 提供了 druid-spring-boot-starter 它引入了 druid、slf4j、以及一个自动配置 druid 的包,其中设置了大量默认配置项,也可以在配置文件中自定义配置值。
2. druid starter 配置: druid/druid-spring-boot-starter 使用方法与详细配置
1 2 3 4 5 6 7 8 9 10 11 12 13 14 15 16 17 18 19 20 spring: datasource: driver-class-name: com.mysql.cj.jdbc.Driver url: jdbc:mysql://localhost:3306/springboot-vue-manage?useSSL=false&useUnicode=true&characterEncoding=utf8&serverTimezone=GMT%2B8 username: root password: 88888888 druid: stat-view-servlet: enabled: true login-username: admin login-password: admin web-stat-filter: enabled: true url-pattern: /* exclusions: '*.js,*.gif,*.jpg,*.png,*.css,*.ico,/druid/*' filters: stat, wall aop-patterns: top.ruoxijun.bean.*
Mybatis: 1. 引入依赖: 1 2 3 4 5 6 7 8 9 10 11 12 13 14 15 16 17 18 19 <dependency > <groupId > mysql</groupId > <artifactId > mysql-connector-java</artifactId > </dependency > <dependency > <groupId > org.mybatis.spring.boot</groupId > <artifactId > mybatis-spring-boot-starter</artifactId > <version > 2.2.2</version > </dependency > <dependency > <groupId > com.github.pagehelper</groupId > <artifactId > pagehelper-spring-boot-starter</artifactId > <version > 1.4.5</version > </dependency >
mybatis-spring-boot-starter 中已经引入 jdbc starter 场景。
2. 添加配置: 1 2 3 4 5 6 7 8 9 10 11 12 13 14 15 16 17 18 spring: datasource: driver-class-name: com.mysql.cj.jdbc.Driver url: jdbc:mysql://localhost:3306/test?useSSL=false&useUnicode=true&characterEncoding=utf8&serverTimezone=GMT%2B8 username: root password: 88888888 mybatis: mapper-locations: classpath:mybatis/mapper/*.xml configuration: map-underscore-to-camel-case: true type-aliases-package: top.ruoxijun.entity pagehelper: helper-dialect: mysql
3. 基础使用:
创建 mapper 接口:
1 2 @Mapper public interface UserMapper { List<User> findAllUser () ; }
每一个 mapper 类都要加一个 @Mapper 注解表明它是一个 mapper 接口,也可以选择在启动类中利用 @MapperScan("top.ruoxijun.mapper") 直接扫描整个 mapper 文件夹。
1 2 3 4 5 @SpringBootApplication @MapperScan("top.ruoxijun.mapper") public class MainApplication { public static void main (String[] args) { SpringApplication.run(MainApplication.class,args); } }
使用扫描可能出现在使用 @Autowired 注解自动装配 mapper 对象时在 idea 编辑器中报红显示找不到对象,但是放心运行时是没有问题的。可以不理也可用以下方法解决:
在 resources 文件夹下新建 mapper-locations 配置中的文件夹,然后建立 mapper 接口的对应 mapper.xml 即可。
1 2 3 4 5 6 <?xml version="1.0" encoding="UTF-8" ?> <!DOCTYPE mapper PUBLIC "-//mybatis.org//DTD Mapper 3.0//EN" "http://mybatis.org/dtd/mybatis-3-mapper.dtd" > <mapper namespace ="对应的 Mapper 文件位置" > </mapper >
Mybatis Plus: 1. 引入依赖: MyBatis-Plus 官网地址 (baomidou.com)
1 2 3 4 5 6 <dependency > <groupId > com.baomidou</groupId > <artifactId > mybatis-plus-boot-starter</artifactId > <version > 3.5.2</version > </dependency >
它已经引入了 mybatis 与 jdbc 等场景。
配置与 MybatisPlusProperties 绑定( mybatis-plus )。
配置 mapper.xml 文件位置属性 mapperLocations ( mybatis-plus.mapper-locations ) 默认值 classpath*:/mapper/**/*.xml 表示任意工程路径下所有 mapper 文件夹的下 xml 都是 mapper.xml (即不仅是当前项目 classpath 还包括 jar 包该路径下)。
2. 简单实例:
在 MainApplication 类上使用 @MapperScan("top.ruoxijun.mapper") 指定扫描的 mapper 接口包(也可使用 @Mapper 注解方式)。
编写 mapper 接口并继承 BaseMapper<User> 泛型是你要操作的表对应的基类:
1 public interface UserMapper extends BaseMapper <User> {}
实现 Service 业务类:
1 2 3 4 5 6 7 public interface UserService extends IService <User> { }@Service public class UserServiceImpl extends ServiceImpl <UserMapper, User> implements UserService { }
实现 Controller 请求:
1 2 3 4 5 6 7 8 9 10 11 12 13 14 15 16 17 18 19 @RestController public class UserController { @Autowired UserService userService; @RequestMapping({"user"}) public Map<String, Object> user ( @RequestParam(value = "pN", defaultValue = "1") Integer pageNum ) { HashMap<String, Object> map = new HashMap <>(); List<User> users = userService.list(); Page<User> userPage = new Page <>(pageNum, 2 ); Page<User> page = userService.page(userPage); map.put("users" , users); map.put("page" , page); return map; } }
分页查询还需要使用分页插件(其它插件使用方式同理):
1 2 3 4 5 6 7 8 9 10 11 @Configuration public class MybatisPlusConfig { @Bean public MybatisPlusInterceptor mybatisPlusInterceptor () { MybatisPlusInterceptor interceptor = new MybatisPlusInterceptor (); PaginationInnerInterceptor paginationInnerInterceptor = new PaginationInnerInterceptor (); interceptor.addInnerInterceptor(paginationInnerInterceptor); return interceptor; } }
Redis:
引入 Redis 场景:
1 2 3 4 5 6 7 8 9 10 <dependency > <groupId > org.springframework.boot</groupId > <artifactId > spring-boot-starter-data-redis</artifactId > </dependency > <dependency > <groupId > redis.clients</groupId > <artifactId > jedis</artifactId > </dependency >
默认引入了 Lettuce 操作 Redis,使用 jedis 需要我们手动引入并且在 client-type 配置项中申明想使用的客户端。
Redis 配置:
1 2 3 4 5 6 7 8 9 10 11 12 13 14 15 16 spring: data: redis: host: 192.168 .0 .166 port: 6379 database: 0 username: password: 123456 connect-timeout: 10s lettuce: pool: max-active: 8 max-wait: 200s max-idle: 8 min-idle: 0
事务控制
SpringBoot 对事务提供了实现并自动配置我们只需在需要添加事务的方法上添加如下注释即可:
1 @Transactional(propagation = Propagation.REQUIRED)
单元测试 简介与使用: 1. 引入依赖: 1 2 3 4 5 <dependency > <groupId > org.springframework.boot</groupId > <artifactId > spring-boot-starter-test</artifactId > <scope > test</scope > </dependency >
2. Junit5: SpringBoot 2.2.0 版本开始引入 JUnit5 作为单元测试默认库,由三个不同子项目的几个不同模块组成JUnit 5 = JUnit Platform + JUnit Jupiter + JUnit Vintage 。
JUnit Platform : Junit Platform 是在 JVM 上启动测试框架的基础,不仅支持 Junit 自制的测试引擎,其他测试引擎也都可以接入。
JUnit Jupiter : JUnit Jupiter 提供了 JUnit5 的新的编程模型,是 JUnit5 新特性的核心。内部包含了一个测试引擎 ,用于在 Junit Platform 上运行。
JUnit Vintage : 由于 JUint 已经发展多年,为了照顾老的项目,JUnit Vintage 提供了兼容JUnit4.x,Junit3.x 的测试引擎。
SpringBoot2.4 以上版本移除了默认对 JUnit Vintage 的依赖,如果需要兼容 junit4 需要自行引入:
1 2 3 4 5 6 7 8 9 10 11 12 <dependency > <groupId > org.junit.vintage</groupId > <artifactId > junit-vintage-engine</artifactId > <scope > test</scope > <exclusions > <exclusion > <groupId > org.hamcrest</groupId > <artifactId > hamcrest-core</artifactId > </exclusion > </exclusions > </dependency >
3. 使用方式:
分别使用 @SpringBootTest 与 @Test (org.junit.jupiter .api.Test)注解标记测试类与测试方法:
1 2 3 4 5 @SpringBootTest public class SpringBootTest { @Test public void test () { } }
被 @SpringBootTest 标记的类支持 @Autowired 、 @Transactional (标注的测试方法,测试完成后自动回滚) 等 SpringBoot 注解。
Junit5 常用注解: JUnit 5 官方文档 - 常用注解
@ParameterizedTest : 表示方法是参数化测试@RepeatedTest : 表示方法可重复执行@DisplayName : 为测试类或者测试方法设置展示名称@BeforeEach : 表示方法在每个单元测试之前执行, @AfterEach (之后)同理@BeforeAll : 表示 静态方法 在所有单元测试之前执行, @AfterAll 同理@Tag : 表示单元测试类别,类似于 JUnit4 中的 @Categories@Disabled : 表示测试类或测试方法不执行,类似于 JUnit4 中的 @Ignore@Timeout : 表示测试方法运行如果超过了指定时间将会返回错误@ExtendWith : 为测试类或测试方法提供扩展类引用
断言机制: 1. 简单断言:
测试方法中前面的断言失败则后面的代码不会执行。
断言方法一般都是 Assertions 中的静态方法,简单使用方式:
1 2 3 4 5 6 7 8 9 10 import static org.junit.jupiter.api.Assertions.assertEquals; @Test void simple () { assertEquals(1 , 1 , "值不相等" ); Object o = new Object (); assertSame(o, o); }
方法
说明
assertEquals
两个对象值或两个原始类型值是否相等
assertNotEquals
两个对象或两个原始类型是否不相等
assertSame
两个对象引用是否指向同一个对象
assertNotSame
两个对象引用是否指向不同的对象
assertTrue
给定的布尔值是否为 true
assertFalse
给定的布尔值是否为 false
assertNull
给定的对象引用是否为 null
assertNotNull
给定的对象引用是否不为 null
assertArrayEquals
两个对象或原始类型的数组是否相等
2. 组合断言:
有需要多个断言全部满足条件时可使用 assertAll :
1 2 3 4 5 6 @Test void assertAllTest () { assertAll("组合断言" , ()-> assertTrue(true ), ()-> assertNotEquals(1 , 2 )); }
3. 异常断言:
业务逻辑在某情况下一定出现异常时使用 assertThrows :
1 2 3 4 5 6 @Test void assertThrowsTest () { assertThrows(ArithmeticException.class, ()-> { int i = 1 / 0 ; }, "异常成功触发" ); }
4. 超时断言: 1 2 3 4 5 @Test public void timeoutTest () { Assertions.assertTimeout(Duration.ofMillis(1000 ), () -> Thread.sleep(500 )); }
5. 快速失败: 1 2 3 4 @Test public void shouldFail () { fail("This should fail" ); }
前置条件: assumptions(假设)当不满足某前置条件时测试将不会继续执行但不会报错:
1 2 3 4 5 6 @Test void assumeTest () { assumeTrue(true , "不是 true" ); assumingThat(true , ()-> System.out.println("是 true" )); }
嵌套测试: 在 Java 内部类上标注 @Nested 注解可实现嵌套测试(可无限嵌套),且内部单元测试会激活外部的 @BeforeEach 等(BeforeAll、After…)方法(反之不行):
1 2 3 4 5 6 7 class JunitTest { @Nested class NestedTest { } }
参数化测试:
@ValueSource : 为参数化测试指定入参来源,支持八大基础类以及 String 类型, Class 类型
@NullSource : 表示为参数化测试提供一个 null 的入参
@EnumSource : 表示为参数化测试提供一个枚举入参
@CsvFileSource :表示读取指定 CSV 文件内容作为参数化测试入参
@MethodSource :表示读取指定方法的返回值作为参数化测试入参(注意方法返回需要是一个流)
使用 @ParameterizedTest 注解标注方法表示这是一个参数化测试的方法:
1 2 3 4 5 6 7 8 9 10 11 12 13 14 15 16 @ParameterizedTest @ValueSource(strings = {"1", "2"}) void valueSourceTest (String s) { assertNotNull(s); } @ParameterizedTest @MethodSource("method") public void testWithExplicitLocalMethodSource (String s) { assertNotNull(s); } static Stream<String> method () { return Stream.of("1" , "2" ); }
指标监控 SpringBoot Actuator:
依赖导入:
1 2 3 4 <dependency > <groupId > org.springframework.boot</groupId > <artifactId > spring-boot-starter-actuator</artifactId > </dependency >
访问路径:
localhost:8080/actuator/ 在此路径下还可以访问更详细的监控端点 /actuator/** ,默认 JMX 暴露所有端点而 web(http) 只默认暴露 health (/actuator/health) 和 info 端点。
配置:
常用监控端点(Endpoint):Health 监控状况、Metrics 运行时指标、Loggers 日志记录。
1 2 3 4 5 6 7 8 9 10 11 12 13 14 15 16 management: endpoints: enabled-by-default: false web: exposure: include: '*' endpoint: health: enabled: true show-details: always metrics: enabled: true loggers: enabled: true
定制 Endpoint (Health、Metrics、Info、Endpoint 等)信息略。
可视化:spring-boot-admin:https://github.com/codecentric/spring-boot-admin
启动过程 启动原理:
在主程序中 SpringApplication.run(MainApplication.class, args) 方法创建了一个 SpringApplication 对象:
保存信息,判断当前应用类型。
找到所有的 bootstrapRegistryInitializers 初始启动引导器(在 spring.factories 找)。
找到所有的 ApplicationContextInitializer 初始化器(在 spring.factories 找)。
找到所有的 ApplicationListener 应用监听器(在 spring.factories 找)。
执行 SpringApplication 对象的 run 方法:
记录应用启动时间,创建引导上下文(DefaultBootstrapContext),它会挨个执行之前获取的 初始启动引导器 的 initialize 方法完成引导启动器上下文环境设置。
让当前应用进入 headless(java.awt.headless) 模式。
获取所有 SpringApplicationRunListeners 运行监听器(在 spring.factories 找),遍历所有的运行监听器并调用它的 starting 方法(监听器执行 应用开始启动 事件)。
保存命令行参数 ApplicationArguments 。
准备环境 ConfigurableEnvironment:
当前上下文有环境信息就获取否则就新创建一个基础环境信息。
配置环境信息对象,读取所有配置源的配置属性值,绑定环境信息。
遍历所有的运行监听器并调用它的 environmentPrepared 方法(监听器执行 环境准备完成 事件)。
创建 IOC 容器 createApplicationContext() (根据项目类型创建容器)。
prepareContext 准备 IOC 容器基本信息:
applyInitializers 应用初始化器,遍历所有 初始化器 对 IOC 容器进行初始化。
遍历所有的运行监听器并调用它的 contextPrepared 方法(监听器执行 IOC 容器准备完成 事件)。
遍历所有的运行监听器并调用它的 contextLoaded 方法(监听器执行 IOC 容器已加载 事件)。
refreshContext 刷新容器,在容器中创建所有需要创建的组件。
afterRefresh 执行容器刷新后处理。
遍历所有的运行监听器并调用它的 started 方法(监听器执行 IOC 容器已启动 事件)。
callRunners 调用所有的 runners:
获取容器中的 ApplicationRunner 与 CommandLineRunner 并且按照 @Order 进行排序。
遍历所有 runners 执行 run 方法。
如果以上有异常发生将调用运行监听器的 failed 方法(监听器执行 项目启动失败 事件)。
无异常将调用运行监听器的 ready 方法(实际执行 running 方法,监听器执行 项目已完全启动 事件),其中如果发生异常依然执行 failed 方法。
最后返回整个 IOC 容器。
自定义监听组件:
需要在 resources 中 META-INF/spring.factories 内配置的组件:
直接可通过 Spring 注入容器中的组件(如添加 @Component 注解等方式):
ApplicationRunner
CommandLineRunner
整合 Jsp
产考文献:Spring Boot 中使用之 JSP 篇
其它问题:spring boot 设置启动时初始化 DispatcherServlet 出错
1. 所需依赖: 1 2 3 4 5 6 7 8 9 10 11 12 13 14 15 16 17 18 19 20 21 22 <dependency > <groupId > org.apache.tomcat.embed</groupId > <artifactId > tomcat-embed-jasper</artifactId > <scope > provided</scope > </dependency > <dependency > <groupId > javax.servlet</groupId > <artifactId > javax.servlet-api</artifactId > </dependency > <dependency > <groupId > javax.servlet.jsp</groupId > <artifactId > javax.servlet.jsp-api</artifactId > <version > 2.3.3</version > </dependency > <dependency > <groupId > javax.servlet</groupId > <artifactId > jstl</artifactId > </dependency >
2. application 配置: 1 2 spring.mvc.view.prefix : /WEB-INF/jsp/ # jsp存放文件夹(注意不包含webapp文件夹) spring.mvc.view.suffix : .jsp # 视图文件后缀
这是 properties 文件配置 yml 配置文件同理转化即可。
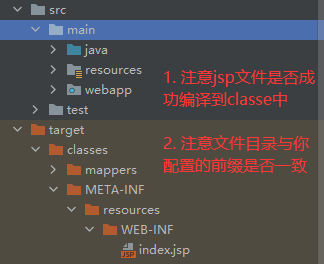
3. idea 设置和问题: 1. 资源过滤问题: 如果遇到 jsp 文件不在编译后的项目中可在 pom.xml 的 build 标签中添加如下资源过滤配置。(可以根据需要更改配置)
1 2 3 4 5 6 7 8 9 10 11 12 13 14 15 16 17 18 19 20 21 22 23 24 25 26 27 <resources > <resource > <directory > src/main/java</directory > <includes > <include > **/*.properties</include > <include > **/*.xml</include > </includes > <filtering > true</filtering > </resource > <resource > <directory > src/main/resources</directory > <includes > <include > **/*.*</include > </includes > <filtering > true</filtering > </resource > <resource > <directory > src/main/webapp</directory > <targetPath > META-INF/resources</targetPath > <includes > <include > **/*.*</include > </includes > </resource > </resources >
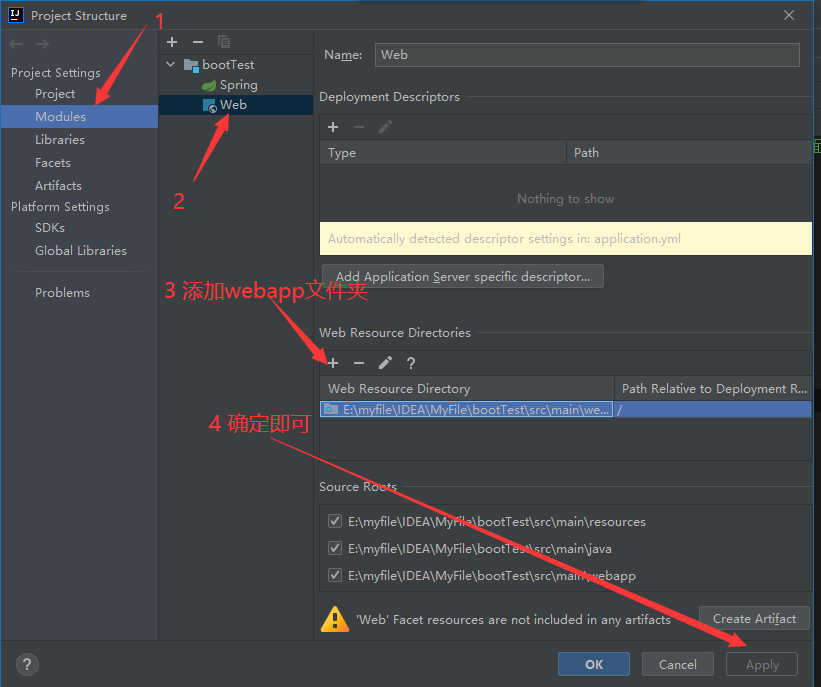
2. 将webapp在idea中设置为web资源文件夹:
3. 项目找不到 jsp 文件:
视图前缀配置中有人容易加上 webapp 文件夹前缀,也是造成jsp页面访问不到的原因。
SpringBoot 任务 异步任务
在主程序类上使用 @EnableAsync 注解开启异步任务。
在需要异步执行的业务方法上添加 @Async 注解。
1 2 3 4 5 6 7 @Service public class TestService { @Async public void asyncTest () throws InterruptedException { Thread.sleep(3000 ); } }
该方法执行时自动异步执行,不会阻碍下方的代码执行。
1 2 3 4 5 @RequestMapping(value = "asyncTest", method = RequestMethod.GET) public String asyncTest () throws InterruptedException { testService.asyncTest(); return "asyncTest" ; }
邮件任务
导入依赖:
1 2 3 4 <dependency > <groupId > org.springframework.boot</groupId > <artifactId > spring-boot-starter-mail</artifactId > </dependency >
以 QQ 邮箱为例,在账户中开启 POP3/SMTP 服务并获取 授权码 。
邮箱配置:
1 2 3 4 5 6 7 8 9 10 11 12 13 14 15 16 17 18 19 20 spring: mail: host: smtp.163.com port: 25 username: mail password: password protocol: smtp default-encoding: UTF-8 properties: mail: smtp: auth: true starttls: enable: true required: true ssl: enable: true socketFactory: port: 25 class: javax.net.ssl.SSLSocketFactory
发送邮件:
1 2 3 4 5 6 7 8 9 10 11 12 13 14 15 @Value("${spring.mail.username}") private String from;@Autowired JavaMailSenderImpl mailSender; @GetMapping("sendMail") public String sendMail (@RequestParam String msg) { SimpleMailMessage sendMail = new SimpleMailMessage (); sendMail.setFrom(from); sendMail.setTo("2994160002@qq.com" ); sendMail.setSubject("邮件主题" ); sendMail.setText("邮件内容" ); mailSender.send(sendMail); return msg + " - 发送成功" ; }
复杂邮件:
1 2 3 4 5 6 7 8 9 MimeMessage mimeMessage = mailSender.createMimeMessage(); MimeMessageHelper helper = new MimeMessageHelper (mimeMessage, true );helper.setFrom(from); helper.setTo("2994160002@qq.com" ); helper.setSubject("邮件主题" ); helper.setText("<h1>开启 HTML 解析</h1>" , true ); helper.addAttachment("附件名称" , new File ("D:\\桌面文件\\IDEA-java主题配色.jar" )); mailSender.send(mimeMessage);
定时任务
在主程序类上使用 @EnableScheduling 注解标注开启定时任务功能。
在需要开启定时任务的业务方法上使用 @Scheduled 注解标注,并使用 cron 表达式指定执行时间。
在线Cron表达式生成器 (qqe2.com)
1 2 3 4 5 6 @Scheduled(cron = "0/5 * * * * *") public void schedulingTest () { SimpleDateFormat date = new SimpleDateFormat ("yyyy-MM-dd HH:mm:ss" ); System.out.println(date.format(new Date ()) + " 每五秒执行" ); }
WebSocket 添加依赖: 1 2 3 4 <dependency > <groupId > org.springframework.boot</groupId > <artifactId > spring-boot-starter-websocket</artifactId > </dependency >
Server(服务端):
配置类中注入 ServerEndpointExporter 启用 websocket 支持:
1 2 3 4 5 6 7 @Configuration public class WebSocketConfig { @Bean public ServerEndpointExporter serverEndpointExporter () { return new ServerEndpointExporter (); } }
编写 websocket 服务端:
1 2 3 4 5 6 7 8 9 10 11 12 13 14 15 16 17 18 19 20 21 22 23 24 25 26 27 28 29 30 31 32 33 34 35 36 37 38 39 40 41 42 43 44 45 46 47 48 49 50 51 52 53 @Slf4j @Service @ServerEndpoint("/websocket/{id}") public class WebSocketServer { private static final Map<String, Session> sessionMap = new HashMap (); @OnOpen public void onOpen (@PathParam("id") String id, Session session) { log.info("onOpen: {} , 当前连接数: {}" , id, sessionMap.size()); sessionMap.put(id, session); sendMsgAll("欢迎: " + id +", 当前人数: " + sessionMap.size()); } @OnMessage public void OnMessage (@PathParam("id") String id, String message) { log.info("OnMessage: {} -> {}" , id, message); sendMsgAllNotMe(id, id+ ":" + message); } @OnClose public void OnClose (@PathParam("id") String id) { log.info("OnClose: {} , 当前连接数: {}" , id, sessionMap.size()); sessionMap.remove(id); sendMsgAll("退出: " + id +", 当前人数: " + sessionMap.size()); } @OnError public void OnError (@PathParam("id") String id, Throwable error) { log.info("OnError: {} , 当前连接数: {}" , id, sessionMap.size()); if (sessionMap.containsKey(id)){ sessionMap.remove(id); } sendMsgAll("出错: " + id +", 当前人数: " + sessionMap.size()); } public static void sendMsg (String id, String message) { Session session = sessionMap.get(id); session.getAsyncRemote().sendText(message); } public static void sendMsgAll (String message) { for (Session session : sessionMap.values()){ session.getAsyncRemote().sendText(message); } } public static void sendMsgAllNotMe (String id, String message) { for (String i : sessionMap.keySet()){ if (!i.equals(id)){ Session session = sessionMap.get(i); session.getAsyncRemote().sendText(message); } } } }
Client(客户端): 1 2 3 4 5 6 7 8 9 10 11 12 13 14 15 16 17 18 19 20 21 22 23 24 25 26 27 28 29 30 31 32 33 34 35 36 37 38 39 40 41 42 43 44 45 @Data @Slf4j @Component @ClientEndpoint public class CqClient { private static Session s; @Value("${client.uri}") private String uri; public boolean connect () { if (s == null || !s.isOpen()){ try { s = ContainerProvider.getWebSocketContainer() .connectToServer(this , new URI (this .uri)); } catch (Exception e) { e.printStackTrace(); return false ; } } return true ; } @OnOpen public void OnOpen (Session session) { log.info("OnOpen 连接成功" ); } @OnMessage public void OnMessage (String message) { log.info("接收消息 ---> " + message); } @OnClose public void OnClose (Session session) { log.info("OnClose 连接关闭" ); } @OnError public void OnError (Session session, Throwable throwable) { log.info("OnError 连接出错" ); } public static void sendMsg (String msg) throws JsonProcessingException { s.getAsyncRemote().sendText(msg); } }
日志
1 2 3 4 5 6 7 8 9 10 11 12 13 14 15 16 17 18 19 20 21 22 private static final Logger logger = LoggerFactory.getLogger(MyClass.class);logger.debug("This is a debug message" ); logger.info("This is an info message" ); logger.warn("This is a warning message" ); logger.error("This is an error message" ); logger.debug("User {} logged in successfully" , username); if (logger.isDebugEnabled()) { String expensiveDebugInfo = generateExpensiveDebugInfo(); logger.debug("Expensive debug info: {}" , expensiveDebugInfo); } try { } catch (Exception e) { logger.error("An error occurred: {}" , e.getMessage(), e); }
在 Spring Boot 项目中只需将 logback-spring.xml 文件放置在 src/main/resources 目录下,Spring Boot 就会在启动时自动加载并应用这个日志配置:
1 2 3 4 5 6 7 8 9 10 11 12 13 14 15 16 17 18 19 20 21 22 23 24 25 26 27 28 29 30 31 32 33 34 35 36 37 38 39 40 41 42 43 44 45 46 47 48 49 50 51 52 53 54 55 <?xml version="1.0" encoding="UTF-8" ?> <configuration > <include resource ="org/springframework/boot/logging/logback/base.xml" /> <property name ="LOG_HOME" value ="./logs" /> <property name ="APP_NAME" value ="application" /> <property name ="MAX_HISTORY" value ="30" /> <property name ="MAX_FILE_SIZE" value ="10MB" /> <property name ="CONSOLE_PATTERN" value ="%d{yyyy-MM-dd HH:mm:ss.SSS} [%thread] %-5level %logger{36} - %msg%n" /> <property name ="FILE_PATTERN" value ="%d{yyyy-MM-dd HH:mm:ss.SSS} [%thread] %-5level %logger{36} - %msg%n" /> <appender name ="Console" class ="ch.qos.logback.core.ConsoleAppender" > <encoder > <pattern > ${CONSOLE_PATTERN}</pattern > </encoder > </appender > <appender name ="RollingFile" class ="ch.qos.logback.core.rolling.RollingFileAppender" > <file > ${LOG_HOME}/${APP_NAME}-0-current.log</file > <encoder > <pattern > ${FILE_PATTERN}</pattern > </encoder > <rollingPolicy class ="ch.qos.logback.core.rolling.TimeBasedRollingPolicy" > <fileNamePattern > ${LOG_HOME}/${APP_NAME}-%d{yyyy-MM-dd}.%i.log</fileNamePattern > <timeBasedFileNamingAndTriggeringPolicy class ="ch.qos.logback.core.rolling.SizeAndTimeBasedFNATP" > <maxFileSize > ${MAX_FILE_SIZE}</maxFileSize > </timeBasedFileNamingAndTriggeringPolicy > <maxHistory > ${MAX_HISTORY}</maxHistory > </rollingPolicy > </appender > <root level ="INFO" > <appender-ref ref ="Console" /> <appender-ref ref ="RollingFile" /> </root > <logger name ="com.example" level ="DEBUG" additivity ="false" > <appender-ref ref ="Console" /> <appender-ref ref ="RollingFile" /> </logger > </configuration >