Vue3 Npm
1. npm(nodejs) 安装: 安装:
下载 nodejs 安装(安装过程直接默认下一步即可)。
npm 配置修改:
npm install cnpm -g :安装 cnpm 淘宝镜像(不建议使用,使用易出错)npm config set registry https://registry.npm.taobao.org/ :npm 使用淘宝镜像路径npm config set registry https://registry.npmmirror.com/ :npm 使用淘宝镜像路径(推荐 )npm config get registry :查看镜像配置npm 依赖缓存位置修改:
npm get cache 或 npm get prefix :查看缓存或保存模块地址npm config set cache "E:\myfile\nodejs\data\node_cache" :缓存地址npm config set prefix "E:\myfile\nodejs\data\node_global" :全局模块地址
注意由于 node 全局模块大多需要命令访问因此,应在系统环境变量 PATH 中添加 node 的全局模块保存地址。
常用命令:
node -v: 查看 nodejs 版本(检查是否安装成功)
npm -v :查看 npm 版本
npm install npm -g :npm 更新与全局安装
npm install jquery :npm 安装软件包命令,在当前文件夹下安装(这里以jquery为例,在后面加上 -g 表示全局安装)
如需指定版本 npm install jquery@3.0.0 ( ‘软件名@版本号’ ),且它会自动清理当前项目之前安装的版本使用你指定的版本
npm install bootstrap -save-dev :表示开发环境使用
npm list -g :查看全局安装的软件包(去除 -g 查看当前文件夹项目下安装的所有软件包)
npm list jquery :查看某个软件包的版本
2. Package.json:
npm init :为当前项目生成 package.json 文件(可初始化 npm 项目)npm run 配置命令 :运行 package.json 文件 scripts 配置中的命令npm install :根据 package.json 文件 dependencies 与 devDependencies 配置为项目安装软件包“jquery”: “^3.0.0” :版本配置 ‘^’ 符号表示 3 的大版本不会改变,后面两位数的版本自动更新。去除该符号则版本不会自动更新。此外使用 ‘~’ 符号表示最后一位数版本自动更新。“main”: “index.js” :配置当前项目的主入口文件,一般默认为当前项目 src 目录下的 index.js 文件。
Webpack
webpack 是一个模块打包器(构建工具)。它主要目标是将 JavaScript 文件打包在一起,打包后的文件用于浏览器中使用,其次它还能 转换、打包、包裹 任何资源(默认只能打包 js 文件,对其它资源打包需要使用到插件)。
webpack 官网:webpack
1. 概念:
树结构:在一个入口文件中引入所有资源,形成树状依赖关系。
模块:对于 webpack 来说所有的资源都称之为模块(.js,.css…)
chunk:打包过程中被操作的模块文件被称之为 chunk。
bundel:最终打包完成的文件。可能和 chunk 一样,大部分情况下它是多个 chunk 的集合。
2. 安装与使用: npm install webpack -g :安装 webpack 软件包。npm install webpack-cli -g:安装 webpack 脚手架,即命令行执行程序。
npm install webpack webpack-cli -g:两个包同时安装命令。
npm i webpack webpack-cli -D:不全局安装仅为当前项目安装(i -> install,d -> 开发环境)
打包 js 文件:
在空项目中初始化 npm npm init -y 。
创建 src 目录与 index.js 主文件(npm 中有介绍默认寻找 src 目录下 index.js),再根据需要创建其它的 JS 文件或者目录,但必须以 ./src/index.js 文件为主文件与其它文件相关联形成树状关系。
打包 webpack --mode=development (开发环境),webpack --mode=production (生产环境)
打包成功以后会在项目下生成 dist 目录,目录中的 main.js 就是打包成功后的 JS 文件。
3. 核心配置: 在 webpack 项目中新建 webpack.config.js (webpack 默认会按此文件配置打包)。
1. 配置选项: 1 2 3 4 5 6 7 8 9 10 11 12 13 14 15 16 17 18 19 20 const {resolve} = require ('path' ); module .exports = { entry : './src/index.js' , output : { filename : "build.js" , path : resolve (__dirname,'build' ) }, module : { rules : [] }, plugins : [], mode : 'production' , }
2. 多入口多出口:
entry 为数组类型:多个入口文件打包形成一个 chunk 并最后输出一个文件
1 2 3 4 5 entry : ['./src/index.js' ,'./src/main.js' ],output : { filename : "build.js" , path : resolve (__dirname,'build' ) },
entry 为对象类型:多个入口文件打包形成多个 chunk 并最后输出多个文件(如下生成 one.js、two.js)
1 2 3 4 5 6 7 8 entry : { one : './src/index.js' , two : './src/main.js' }, output : { filename : "[name].js" , path : resolve (__dirname,'build' ) },
1 2 3 4 5 6 7 8 entry : { one : './src/index.js' , two : ['./src/index.js' ,'./src/main.js' ], }, output : { filename : "[name].js" , path : resolve (__dirname,'build' ) },
3. 打包 HTML 文件:
安装打包插件(仅开发环境使用): npm i html-webpack-plugin -D
1 2 3 4 5 6 7 8 9 10 11 12 13 14 15 16 17 18 const htmlWebpackPlugin = require ('html-webpack-plugin' ); plugins : [ new htmlWebpackPlugin (), new htmlWebpackPlugin ({ template : './src/index.html' , filename : 'main.html' , chunks : ['one' ,'two' ], minify : { collapseWhitespace : true , removeComments : true } }), ],
4. 打包 CSS 文件: 安装 css-loader 和 style-loader ,css-loader 打包单个文件并处理 @import 和 URL 等外部资源。style-loader 在 head 标签中插入 style 标签并将打包的 css 样式利用 js 嵌入其中(只是单纯打包 css 文件可以忽略此插件)。
安装命令: npm i css-loader style-loader -D
1 2 3 4 5 6 7 8 9 10 require ('./style.css' ); module : { rules : [{ test : /\.css$/ , use : ['style-loader' ,'css-loader' ], }] },
5. 打包图片、字体图标,eslint js语法检查(略): webpack打包详解
6. DevServer:
target: "web"
1 2 3 4 5 6 7 devServer: { port: 8081 , compress: true , open: true , hot: true }
7. 去除无用的 js、css (略): ES6 语法 1. let、const : var : 可以重复声明、无法限制修改、没有块级作用域。
let : 不能重复声明、拥有块级作用域。
const : 与 let 类似但仅作为常量使用。
2. 箭头函数与 this 指向:
箭头函数返回对象问题:
1 2 3 4 5 6 7 var o = (name :'hello' ,num :1 };console .log (o ()); var o = (return {name :'hello' }}; console .log (o); var o = (name :'hello' ,num :1 }); console .log (o ());
普通函数 this 指向它的调用者。
箭头函数 this 指向它定义时所处位置的外层 this 。
3. 数组方法: map 映射: arr.map(function(values,index,array){}) 函数返回值为映射数组元素的值。
filter 过滤: arr.filter(function(values){}) 函数返回值 true 表示保留当前数组元素。
forEach : arr.forEach(function(values){}) 迭代器遍历。
reduce 汇总:arr.reduce((newValue,nextValue,index)=>{},?initialValue)
1 2 3 4 5 6 7 8 9 var array = [2 ,3 ,4 ];array.reduce ((newValue,nextValue )=> { console .log (newValue,nextValue); return newValue+nextValue; }, 0 ); array.reduce ((newValue,nextValue )=> { console .log (newValue,nextValue); return newValue+nextValue; });
4. Module 模块化: 注意模块化必须在服务器中使用,本地无效。vscode 可以使用 Live Server ,idea 直接点击浏览器图标即可。
1. main.html 中引入主 main.js : 1 <script src ="main.js" type ="module" > </script >
2. export 和 import :
1 2 3 4 5 let a = 1 ;function b ( console .log ("js1.js b()" ); } export {a,b};
1 2 3 4 5 export let a = 1 ; export default function ( console .log ("js2.js default" ); }
1 2 3 4 5 6 7 8 9 import {a as a1,b} from "./js1.js" ; import {a} from "./js2.js" ; import def from "./js2.js" ; console .log (a1,a);b ();def ();
Axios 1. ES6 Promise:
主要用于异步计算
可以将异步操作队列化,按照期望的顺序执行,返回符合预期的结果
可以在对象之间传递和操作 promise,帮助我们处理队列
基本用法:
1 2 3 4 5 6 7 8 9 10 11 12 13 14 15 16 17 18 19 20 21 22 23 24 25 26 new Promise ((resolve,reject )=> { console .log ("执行方法 promise1" ); resolve ("方法 promise1 执行完成" ); reject ("方法 pormise1 执行错误" ); }).then ( res => console .log (res); return new Promise ((resolve,reject )=> { console .log ("执行方法 promise2" ); reject ("方法 promise2 执行错误" ); }); },err => console .log (err); }).then (res =>err => console .log (err); }).catch (err => console .log (err); });
Promise.all(Promise[]) 并发处理:
1 2 3 4 5 6 7 8 9 Promise .all ([ new Promise (resolve => resolve ("promise1 执行完成" ); }), new Promise (resolve => resolve ("promise2 执行完成" ); }) ]).then (res =>console .log (res));
2. 简单使用:
在 cdnjs 中搜索 axios 引入 js 文件 :
<script src="https://cdnjs.cloudflare.com/ajax/libs/axios/0.27.2/axios.min.js"></script>
1 2 3 4 5 6 7 8 9 10 11 12 13 14 15 16 17 18 19 20 21 22 23 24 25 26 27 28 axios ('/api' ).then (res => console .log (res); }); axios ({ rul : '/api' , method : "POST" , params : { name : 'ruoxijun' , age : 18 , }, data : { name : 'ruoxijun' , age : 18 , } }).then (res =>console .log (res)) .catch (err =>console .log (err)); axios.get ('/api' ,{ params : { name : 'ruoxijun' , age : 18 , }, }).then (res =>console .log (res)); axios.post ('/api' ,'name=ruoxijun&age=18' ).then (res =>console .log (res));
axios 并发请求处理 :
axios.all 与 Promise.all 方法类似
1 2 3 4 5 6 7 8 9 10 11 12 13 14 15 axios.all ([ axios.get ('/api' ), axios.get ('/api' ), ]).then (res =>console .log (res)) .catch (err =>console .log (err)); axios.all ([ axios.get ('/api' ), axios.get ('/api' ), ]).then ( axios.spread ((res1,res2 )=> { console .log (res1,res2); }) ).catch (err =>console .log (err));
3. 全局配置与封装: 1 2 3 4 5 6 7 8 9 10 11 12 13 14 15 16 axios.defaults .baseURL = "http://localhost" ; axios.defaults .timeout = 5000 ; let git = axios.create ({ baseurl : "https://github.com/" , timeout : 5000 , }); let local = axios.create ({ baseurl : "https://localhost" , timeout : 5000 , }); git.get ("/api" ).then (res =>console .log (res));
4. 拦截器: 1 2 3 4 5 6 7 8 9 10 11 12 axios.interceptors .request .use (config => return config; },error => return Promise .reject (error); }); axios.interceptors .response .use (config => return config; },error => return Promise .reject (error); });
Vue3 1. 初识 vue3:
1 2 3 4 5 6 7 8 9 10 11 12 13 14 15 16 17 18 19 20 const app = { data ( return { message : 'hello world' } }, }; const vm = Vue .createApp (app).mount ("#app" );vm.message = 'hello' ; vm.$data .message = 'world' ;
2. vue-cli: Vue-Cli(Command Line Interface) 是 vue 官方提供的脚手架工具。默认已经帮我们搭建好了一套利用 Webpack 管理 vue 的项目结构。
1. 命令须知:
安装命令: npm install -g @vue/cli
检查版本: vue -version 或 vue -V
创建项目: vue create 项目名称
卸载命令: npm uninstall -g vue-cli
2. 项目创建:
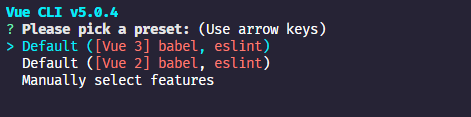
执行 vue create vue3-demo1 命令开始创建项目:
此处使用上下键加回车进行选择,前两个选项表示创建默认的 vue3 或 vue2 项目。默认创建的项目中包含两个插件:
babel : 检查 es6转es5
eslint : 检查 es 语法与修复
第三个选项 Manually select features 表示手动创建项目,建议使用。
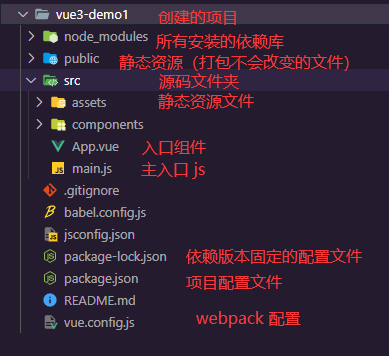
默认的 vue3 项目结构:
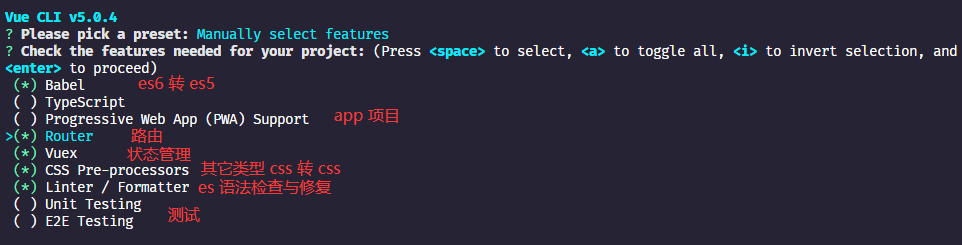
手动创建项目:
选择 Manually select features 后进入上界面,通过上下键与空格选择或取消,选择完成后回车进入下一步。
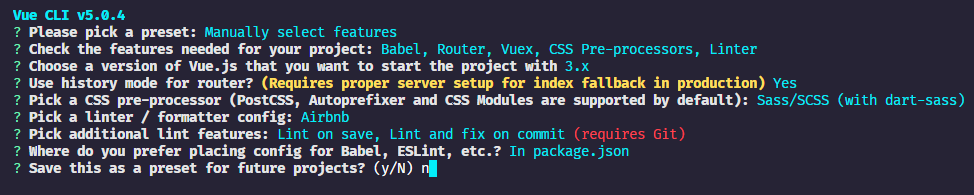
之后对项目以及插件进行配置操作如下:
如果最后对项目配置进行了保存删除 C:\当前用户文件夹\.vuerc 文件中可以去除保存的配置。
3. vue.config.js: 当我们需要对 webpack 或插件进行配置时只需要在项目的根路径下新建 vue.config.js ,vue-cli 提供了方便的配置方法,我们也可以选择使用 webpack 原生的配置方法进行配置。
配置详情请参照: Configuration Reference | Vue CLI (vuejs.org)
1 2 3 4 5 6 7 module .exports = { outputDir : 'build' , configureWebpack : { plugins : [] } }
3. Vue3 语法: 1. 基础语法:
插值表达式: {{msg}} 注意只接受表达式,不能使用语句
简单指令 v-指令 :
v-pre :不解析该标签中的 vue 语法v-once :该标签中的 vue 语法只解析一次v-text :向该标签中插入文本v-html :向改标签中插入 html(v-html=”不能在此直接书写html”)v-show :是否显示该标签v-if , v-else , v-else-if :是否渲染该标签v-cloak :防止弱网络环境下渲染闪烁问题
2. v-bind:
简单使用:
v-bind:属性名 主要对标签的属性进行绑定,除此它还有一种简写的方式 :属性名 。
绑定 style:
1 2 3 4 5 6 7 8 9 10 11 <div :style="['font-size:22px','width:200px',fontcolor,styles]" style="width:100px;" > div 1 </div> <div :style ="{color:'red','font-size':'18px'}" > div 3 </div > data ( return { fontcolor : 'color:red' , styles : {backgroundColor : '#123' }, } }
绑定 class:
style 与 class 的属性绑定都支持 字符串、数组、对象(常用)、方法 。
1 2 3 4 5 6 7 8 9 10 11 12 13 <div :class ="one" > div 3 </div> <div :class ="{one:isone,istwo}" > div 4 </div > data ( return { one : 'one' , isone : true , istwo : true } } .one {color : blue;} .istwo {font-size :18px;}
3. computed:
1 2 3 4 <h1 > 插值方式: {{name + msg}}</h1 > <h1 > 方法返回: {{getTitle()}}</h1 > <h1 > 计算属性: {{title}}</h1 > <h1 > 使用 set: {{setTitle()}}</h1 >
1 2 3 4 5 6 7 8 9 10 11 12 13 14 15 16 17 18 19 20 21 22 23 24 25 26 27 28 29 data ( return { name : 'hello' , msg : 'world' , } }, methods : { getTitle ( return this .name + this .msg ; }, setTitle ( this .title2 ='hi' ; return this .title2 ; } }, computed : { title ( return this .name + this .msg ; }, title2 :{ get ( return this .name + this .msg ; }, set (newVla ) { this .msg = newVla; } } }
计算属性只有在 get 方法中 vue 的属性值发生改变时,才会重新计算否则都将使用缓存的数据。而普通方法看你在页面中调用了多少次则运行多少次。
4. v-on:
v-on:click :绑定一个点击事件,简写 @click
当调用事件方法时没有传入参数,且声明方法时只有一个参数,默认该参数的值就是事件 event 对象。当有多个参数且我们需要事件对象时 $event 作为参数它就代表了当前事件对象(@click="click(val,$event)");
事件修饰符:
stop :阻止事件冒泡self :当前事件由该元素本身触发时才执行capture :事件捕获模式(如点击事件触发且冒泡时,会优先执行添加该修饰符的外层)prevent :阻止默认事件once :事件只触发一次
5. v-for: v-for 可以循环渲染标签
v-for="(item, [index]) in arr" :循环数组v-for="(val, [key], [index]) in obj" :循环对象
vue 对于循环的标签提供了一个 :key 唯一标识符属性,当循环的数组或者对象改变时它会去对比这个 key 值,只重新渲染改变了的数据,而不去影响未改变的数据增加渲染效率。
<div v-for="(v,i) in arr" :key="i"></div> :使用唯一标识符的循环
在 vue3 中 v-if 优先级大于 v-for ,vue2 反之。
6. v-model:
<input v-model="val" /> :
修饰符:
lazy :懒加载number :让绑定值(默认 string)转换为 number 类型trim :去除绑定值两端的空格
单选框与多选框:
1 2 3 4 5 6 7 8 9 10 11 12 13 14 15 16 17 18 19 20 <div > 性别:{{sex}}</div > 男:<input type ="radio" value ="男" v-model ="sex" > <br /> 女:<input type ="radio" value ="女" v-model ="sex" > <br /> 协议:<input type ="checkbox" value ="yes" v-model ="type" > {{type}} <br /> <div > 爱好:{{like}}</div > java:<input type ="checkbox" value ="java" v-model ="like" > <br /> html:<input type ="checkbox" value ="html" v-model ="like" > <br /> php:<input type ="checkbox" value ="php" v-model ="like" > <br /> <select v-model ="select" > <option value ="1" > 1</option > <option value ="2" > 2</option > </select > <br /> <select v-model ="selects" multiple > <option value ="1" > 1</option > <option value ="2" > 2</option > </select >
这里 v-model 就代表了它们的 name 属性同时与 value 绑定。
radio 需要默认选中时将绑定的变量设置为你需要的 value 即可。
checkbox 单个时绑定的属性为值为 true/false 表示它是否选中。多个时绑定一个数组,数组的值可以设置为需要默认选中的 value 数组值。
select 标签使用上同理多选绑定数组即可。
7. watch: 1 2 3 4 5 6 7 8 watch :{ message (newVal, oldVal ){}, obj : { handler (newVal, oldVal ){}, immediate : true , deep : true , } }
8. Teleport: 1 2 3 4 <Teleport :disabled ="true" to ="body" > <div > Hello from the modal! </div > </Teleport >
9. component: 1 2 3 4 5 6 7 8 9 10 11 12 13 14 15 16 17 18 <script > import Foo from './Foo.vue' ;import Bar from './Bar.vue' ;export default { components : { Foo , Bar }, data ( return { view : 'Foo' } } } </script > <component :is ="view" /> <component :is ="Foo" />
4. 组件化开发: 1. 创建组件: 我在 components 文件夹中创建了一个名为 MyComponent.vue 文件,这是组件化开发一个组件的基本格式。
1 2 3 4 5 6 7 8 9 10 11 12 13 14 15 16 17 18 19 <template > <div v-text ="msg" > </div > </template > <script > export default { name : "Demo" , data ( return { msg : "this is MyComponent" , } } } </script > <style scoped lang ="scss" > </style >
关于 lang=”scss” 使用:学习Scss-看这篇就够了 - SegmentFault 思否
2. 引用组件: 在 App.vue 中引用 MyComponent.vue 。
1 2 3 4 5 6 7 8 9 10 11 12 13 14 15 16 17 <template > <div > <MyComponent class =“my-style” > </MyComponent > <my-component > </my-component > </div > </template > <script > import MyComponent from '@/components/MyComponent' ; export default { name : 'App' , components : { MyComponent , } } </script >
3. props(父传子):
props 数组定义组件属性:
1 2 3 4 5 6 7 8 9 10 11 12 13 <template > <div > 接收的父类消息: {{parentMsg}}</div > </template > <script > export default { props : ['parentMsg' , ], } </script > <my-component :parent-msg ='msg' > </my-component >
props 对象定义组件属性并添加验证:
1 2 3 4 5 6 7 8 9 10 11 12 13 14 15 16 17 18 19 20 21 22 23 24 25 26 27 28 29 30 31 32 props : { propA : Number , propB : [String , Number ], propC : { type : String , required : true }, propD : { type : Number , default : 100 }, propE : { type : Object , default : { message : 'hello' }, }, propF : { validator : function (value ) { return ['success' , 'warning' , 'danger' ].indexOf (value) !== -1 } } }
type 可以是如下类型,type 也可以是一个自定义构造器,使用 instanceof 检测:
StringNumberBooleanArrayObjectDateFunctionSymbol
4. $emit(子传父):
子组件无法直接改变 props 接收到的数据,可以通过向父组件传递数据方式通知父组件来改变数据。
官方建议:强烈建议使用 emits 记录每个组件所触发的所有事件(与 props 属性类似)。
在子组件中:
1 2 3 4 5 6 7 8 9 10 11 12 13 14 15 16 17 18 19 <template > <div > <div > 接收的父类数据: {{number}}</div > <button @click ="addNumber(2)" > +</button > </div > </template > <script > export default { props : ['number' ], emits : ['addNumber' ], methods : { addNumber (num ) { this .$emit('addNumber' ,num); } }, } </script >
在父组件中:
1 2 3 4 5 6 7 8 9 10 11 12 13 14 15 16 17 18 19 20 21 22 23 24 25 <template > <div > {{number}} <my-component :number ="number" @add-number ="addNumber" > </my-component > </div > </template > <script > import MyComponent from '@/components/MyComponent' ;export default { components : { MyComponent , }, data ( return { number : 0 , } }, methods : { addNumber (num ) { this .number += num; } }, } </script >
5. 父子间直接访问:
$parent :在子组件中使用该属性可直接调用父组件的方法或属性$root :直接访问根组件中的属性(一般是 App.vue)$children :vue2 中使用该属性访问子组件属性(vue3 已弃用 )$refs : 访问子组件属性或获取 dom 元素:
1 2 3 4 5 6 7 <my-component ref ="com1" > </my-component > <my-component ref ="com2" > </my-component > this.$refs.com1.msg="msg1"; this.$refs.com2.msg="msg2";
ref 作用在普通 html 标签中时获取到的是标签 dom 元素。
ref 与 v-for 一同使用时,vue2 时 $refs 会返回循环的 dom/组件 数组,vue3 中为了效率需要给 ref 绑定一个函数处理 ref 。
1 2 3 4 5 <div v-for ="i in 10" :ref ="setItemRef" > {{ i }} </div > setItemRef(el) { // 参1为循环得到的 dom/组件 this.divArr.push(el); }
6. slot 插槽:
基本使用:
1 2 3 4 5 <template > <div class ="child" > <slot > <span > 缺省内容(默认内容)</span > </slot > </div > </template >
slot 标签表示一个插槽,当使用该组件未插入任何内容时,会将 slot 标签中的内容作为默认内容显示。
具名插槽:
1 2 3 4 5 6 7 8 9 10 11 12 13 14 15 16 17 18 19 20 21 22 23 24 25 26 <template > <div class ="child" > <div > <slot name ="one" > 1</slot > </div > <div > <slot name ="two" > 2</slot > </div > <div > <slot > 3</slot > </div > </div > </templat > <my-component > <template v-slot:one > <span > 插入 one 中</span > </template > <template #two > <span > 插入 two 中</span > </template > <template v-slot:default > <span > 插入 default 中</span > </template > </my-component >
当子组件中有多个插槽时,插入的内容默认会插入所有没有 name 属性值的插槽中(name="" 不会)。
插槽传值:
1 2 3 4 5 6 7 8 9 10 11 12 13 14 15 16 17 18 19 20 21 22 23 <template > <div class ="child" > <slot :val ="msg" > 使用 v-bind 定义 val 属性绑定 msg,可以定义多个属性,绑定任意值</slot > </div > </template > <script > export default { data ( return { msg : "this is child msg" } }, } </script > <my-component > <template v-slot:default ="child_val" > <span > 插入 default 中 - {{child_val.val}}</span > </template > </my-component >
动态插槽:
1 2 3 4 5 6 7 8 9 10 11 12 <my-component > <template #[slotName ]> {{ slotName }} </template > </my-component > <script > export default { data ( return { slotName : "one" } }, } </script >
7. keep-alive: 官方解释:
<keep-alive> 包裹动态组件时,会缓存不活动的组件实例,而不是销毁它们。和 <transition> 相似,<keep-alive> 是一个抽象组件:它自身不会渲染一个 DOM 元素,也不会出现在组件的父组件链中。
当组件在 <keep-alive> 内被切换时,它的 mounted 和 unmounted 生命周期钩子不会被调用,取而代之的是 activated 和 deactivated。(这会运用在 <keep-alive> 的直接子节点及其所有子孙节点。)
主要用于保留组件状态或避免重新渲染。
1 2 3 <keep-alive > <component :is ="view" > </component > </keep-alive >
include / exclude (包含/排除):
1 2 3 4 5 6 7 8 9 10 11 12 13 14 <KeepAlive include ="a,b" :max ="10" > <component :is ="view" /> </KeepAlive > <KeepAlive :include ="/a|b/" > <component :is ="view" /> </KeepAlive > <KeepAlive :include ="['a', 'b']" > <component :is ="view" /> </KeepAlive >
8. 组件生命周期函数: 1. 组件生命周期图:
2. 组件生命周期方法: 1 2 3 4 5 6 7 8 9 10 11 12 13 14 15 16 17 18 19 20 21 22 23 24 25 26 27 28 29 30 beforeCreate ( console .log ("实例刚刚被创建" ); }, created ( console .log ("实例已经创建完成" ); }, beforeMount ( console .log ("模板编译之前" ); }, mounted ( console .log ("模板编译完成" ); }, beforeUpdate ( console .log ("数据更新之前" ); }, updated ( console .log ("数据更新完成" ); }, activated ( console .log ("keep-alive 缓存的组件激活时" ); }, deactivated ( console .log ("keep-alive 缓存的组件停用时" ); }, beforeUnmount ( console .log ("实例销毁之前" ); }, unmounted ( console .log ("实例销毁完成" ); }
3. $nexTick : 官方解释: 将回调推迟到下一个 DOM 更新周期之后执行。在更改了一些数据以等待 DOM 更新后立即使用它。
1 2 3 this .$nextTick(function ( })
例如在 created 中 Dom 还未创建完成,这时我们可以使用 $nexTick 写入即将对 Dom 进行的操作,等待 Dom 更新创建完成后将执行该操作。
列如一个很大的数组做了很大的改动你需要 Dom 更新完成之后做些什么,这时你可以在数组操作完的下一句使用 $nextTick 它会在 Dom 改动且渲染完成后做出操作。
Axios 与 Vue 1. Vue 中使用 Axios:
项目中安装 Axios:npm i axios -S
在组件中直接使用:
1 2 import axios from "axios" ;
新建 js 文件封装 axios(以 src 下新建 @/utils/request.js 文件为例):
1 2 3 4 5 6 7 8 9 import axios from 'axios' const request = axios.create ({ }) export default request
在组件中直接引入使用即可: import {request} from "@/utils/request"
2. Vue 封装 Axios 模板: 内容展示省略(TODO)
VueRouter 1. 认识路由:
1. 基础使用:
vue 中使用路由参照 vue-cli 创建路由项目(src 下 router/index.js ):
1 2 3 4 5 6 7 8 9 10 11 12 13 14 15 16 17 18 19 20 21 22 import { createRouter, createWebHistory } from 'vue-router' import HomeView from '../views/HomeView.vue' const routes = [ { path: '/' , name: 'home' , component: HomeView }, { path: '/about' , name: 'about' , component: () => import ('../views/AboutView.vue' ) } ] const router = createRouter({ history: createWebHistory(process.env.BASE_URL), routes }) export default router
路由中导入组件 import from 方式打包时会将所有组件与路由打包到同一个 js 中。
() => import('组件') 会将组件打包为单个 js 文件实现懒加载,推荐使用。
在 main.js 中注册路由:
1 2 import router from './router' createApp (App ).use (router).mount ('#app' )
在 App.vue 中使用路由:
1 2 3 4 5 6 7 8 9 10 11 12 13 <template > <router-link to ="/" > Home</router-link > <router-link to ="/about" > About</router-link > <router-view /> </template > <style > a .router-link-exact-active { color : #42b983 ; } </style >
2. 路由模式: Hash :使用 URL 的 hash值来作为路由,且 URL 中会带有 # 号 。
History :历史模式借助 HTML5 History API 实现。
切换 Hash 模式:
1 2 3 4 5 6 import { createRouter, createWebHistory, createWebHashHistory} from 'vue-router' const router = createRouter ({ history : createWebHashHistory (process.env .BASE_URL ), routes })
3. 重定向与别名: 1 2 3 4 5 6 7 8 9 10 11 12 13 14 15 16 17 { path : '/' , name : 'home' , component : ()=> import ('../views/HomeView.vue' ), },{ path : '/index' , alias : ['/index.html' ,'/home' ], redirect : '/' , },
2. router-link:
为路由激活状态的 router-link 设置 class:
1 2 <router-link to ="/" active-class ="active" target ="_blank" > Home</router-link >
1 2 3 4 5 6 7 8 9 10 11 12 <router-link to ="/about" > <button > About</button > </router-link > <button @click ="$router.push('/user')" > 个人中心</button > <button @click ="$router.replace('/about')" > 关于我们</button > <button @click ="$router.go(-1)" > 返回</button > <h3 > {{$route.path}}</h3 >
可以为 router-view 设置 name 属性:
1 2 3 4 5 <router-view > </router-view > <router-view name ="home" > </router-view > <router-view name ="about" > </router-view >
配置路由时使用 components 对象:
1 2 3 4 5 6 7 8 9 10 { path : '/' , name : 'home' , components : { default : ()=> import ('../views/HomeView.vue' ), home : ()=> import ('../views/HomeView.vue' ), about : ()=> import ('../views/AboutView.vue' ), } },
3. 嵌套路由:
路由中定义子路由:
1 2 3 4 5 6 7 8 9 10 11 12 13 14 15 16 17 { path : '/about' , component : () => import ('../views/AboutView.vue' ), children : [ { path :'' , component : ()=> import ('../components/Children1.vue' ) },{ path : 'children1' , component : ()=> import ('../components/Children1.vue' ) },{ path : 'children2' , component : ()=> import ('../components/Children2.vue' ) } ] },
使用子路由(这里是 AboutView.vue 中):
1 2 3 <router-link to ="/about/children1" > Children1</router-link > <router-link to ="/about/children2" > Children1</router-link > <router-view > </router-view >
注意 父级路由 不能设置 name 属性。
4. 动态路由与参数传递: 1. params 与 query 传参:
路由定义:
1 2 3 4 5 6 7 8 { path : 'children1/:msg' , component : ()=> import ('../components/Children1.vue' ) },{ path : 'children2' , name : 'children2' , component : ()=> import ('../components/Children2.vue' ) }
使用路由并传递参数:
1 2 3 4 5 6 <router-link to ="/about/children1/1" > 子路由页面 - 1</router-link > <router-link to ="/about/children2?name=user&age=18" > 子路由页面 - 2</router-link > <router-link :to ="{path:'/about/children2',query:{name:'user',age:18}}" > 子路由页面 - 2</router-link > <router-link :to ="{name:'children2',query:{name:'user',age:18}}" > 子路由页面 - 2</router-link >
在对应组件中接收参数值:
2. props 传参: 将 props 传递给路由组件 | Vue Router (vuejs.org)
在 params 传参基础之上定义路由时添加 props: true 属性值。
1 2 3 4 5 6 { path : '/user/:id' , name : 'user' , props : true , component : ()=> import ('../views/UserView.vue' ), }
在此对应路由组件 props 属性中定义一个与路径变量名同名的属性类接收此参数值。
1 2 3 4 5 <script > export default { props : ['id' ], } </script >
5. 导航守卫:
1 2 3 4 5 6 7 { path : '/' , component : ()=> import ('../views/HomeView.vue' ), meta : { title : '首页' , } }
1. 全局守卫: 1 2 3 4 5 6 7 8 9 10 11 12 13 14 15 16 17 18 19 20 21 router.beforeEach ((to, from )=> { console .log (to.path ,from .fullPath ); }); router.beforeResolve (to => }); router.afterEach ((to, from , failure )=> { document .title = to.meta .title ; });
2. 路由守卫: 1 2 3 4 5 6 7 8 9 10 { path : '/user/:id' , component : ()=> import ('../views/UserView.vue' ), beforeEnter : (to, from ) => { }, }
3. 组件守卫: 1 2 3 4 5 6 7 8 9 10 11 12 13 14 15 16 17 18 19 <script> export default { beforeRouteEnter (to, from , next ) { next (vm => }); }, beforeRouteUpdate (to, from ) { }, beforeRouteLeave (to, from ) { }, } </script>
4. 导航流程:
导航被触发。
在失活的组件里调用 beforeRouteLeave 守卫。
调用全局的 beforeEach 守卫。
在重用的组件里调用 beforeRouteUpdate 守卫(2.2+)。
在路由配置里调用 beforeEnter。
解析异步路由组件。
在被激活的组件里调用 beforeRouteEnter。
调用全局的 beforeResolve 守卫(2.5+)。
导航被确认。
调用全局的 afterEach 钩子。
触发 DOM 更新。
调用 beforeRouteEnter 守卫中传给 next 的回调函数,创建好的组件实例会作为回调函数的参数传入。
6. keep-alive 与 transition:
vue2 时可以直接使用 transition 或 keep-alive 包裹组件。
vue3 需使用下方式:
1 2 3 4 5 6 7 <router-view v-slot ="{ Component }" > <transition > <keep-alive > <component :is ="Component" /> </keep-alive > </transition > </router-view >
Vuex 1. 认识 Vuex:
工作原理:
引入方式:
在 src/store 目录下新建 index.js 内容如下:
1 2 3 4 5 6 7 8 9 10 11 12 13 14 import { createStore } from 'vuex' export default createStore ({ state : { }, getters : { }, mutations : { }, actions : { }, modules : { } });
在 main.js 中注册 Vuex :
1 2 import store from './store' createApp (App ).use (store).mount ('#app' );
2.核心概念: 1. State(状态):
在 Vuex 的 state(src/store/index.js )中可以存储记录任意属性值,因此也被称之为 Vuex 的状态。
1 2 3 4 5 export default createStore ({ state : { name : 'ruoxijun' , }, })
1 2 3 4 5 6 7 8 9 10 11 12 13 <template > <div > {{$store.state.name}} - {{name}}</div > </template > <script > export default { data ( return { name : this .$store .state .name , } }, } </script >
2. Mutation(改变): 组件中使用 $store.state 访问状态属性,也可以直接修改属性值,但并不推荐。官方推荐我们使用 mutations 搭配 $store.commit 的方式来修改状态。
1 2 3 4 5 6 7 8 9 10 11 12 13 14 15 16 17 18 19 20 21 22 mutations : { setStateName (state, payload ) { state.name = payload; }, } methods : { setStateName ( this .$store .commit ('setStateName' ,this .name ); } },
使用对象风格 commit:
1 2 3 4 5 6 7 8 9 10 11 this .$store .commit ({ type : 'setStateName' , name : this .name }); setStateName (state, payload ) { state.name = payload.name ; },
3. Getter(属性):
Vuex 中 getters 与 vue 中的计算属性类似:
1 2 3 4 5 6 7 getters : { nameAndNum (state, getters ){ return state.name + state.loginUser .number ; } },
组件中使用 $store.getters 进行访问:
1 <div > geteer:{{$store.getters.nameAndNum}} </div >
1 2 3 4 functionName (state, getters){ return parameter => }
4. Action(异步): Action 可以包含任意异步操作,常用做异步请求之类操作。
1 2 3 4 5 6 7 8 9 10 11 12 13 14 actions : { action1 (context ){ setTimeout (()=> console .log (context),1500 ); }, action2 ({state, commit, getters, dispatch}, payload ){ } },
组件中使用 $store.dispatch 调用方法:this.$store.dispatch("action1")
使用大致与 commit 类似,它的参2也用来接收参数(同样支持对象风格的 dispatch)
context 中还包含了 rootState 和 rootGetters 两个属性,这是在下面模块中需要用到的。
5. Module(模块): Vuex 允许我们将 store 分割成 模块(module) ,每个模块拥有自己的 state、mutation、action、getter、甚至是嵌套子模块。
state(子模块状态):
注册一个子模块 module1 : modules: { module1 }
1 2 3 4 5 6 7 8 const module1 = { state : ()=> { return { module1Name : 'module1Name' } }, }
getters、mutations、actions:
默认 情况下,模块内部 的 getters、mutations、actions 仍然是注册在 全局命名空间 的——这样使得多个模块能够对同一个 getters、mutations、actions 作出响应。
1 2 3 4 5 6 7 8 9 10 11 12 13 14 15 16 17 18 19 20 21 22 23 24 25 26 27 28 mutations : { setName (state, payload ){ state.module1Name = payload; } }, getters : { getModule1Name (state, getters, rootState, rootGetters ){ return module1Name + rootState.name ; } }, actions : { module1Actions ({rootState, rootGetters}, payload ){} }, modules : { }
命名空间:
getters、mutations、actions 默认是与根模块整合的(同名属性根模块优先),如果希望你的模块具有更高的封装度和复用性,你可以通过添加 namespaced: true 的方式使其成为带命名空间的模块。
1 2 3 4 5 6 7 8 9 10 11 12 13 14 15 16 17 const module1 = { namespaced : true , modules : { myPage : { getters : { profile () {} } }, posts : { namespaced : true , getters : { popular () {} } } } }
访问方式(state 自带命名空间):
1 2 3 $store.getters ['module1/getModule1Name' ] $store.commit ('module1/setName' , payload) $store.dispatch ("module1/setName" , payload)
Vuex 模块化编程:
将 getters、mutations、actions、modules 抽取出来形成单独的 JS 文件,使用 export default 导出并在 Vuex 主文件导入。
1 2 3 4 5 6 7 8 9 10 11 12 13 14 15 16 17 18 19 20 import { createStore } from 'vuex' ;import getters from './getters' ; import mutations from './mutations' ;import actions from './actions' ;import module1 from './module/module1' ;const state = {}export default createStore ({ state, getters, mutations, actions, modules : { module1, } })
Composition API 1. setup: setup 函数是一个新的组件选项,作为组件中组合式 API 的入口,函数在 beforeCreate 生命周期钩子执行之前执行,实例还没生成,没有 this
setup 有两个可选参数 props 与 context ,props 是访问组件 props 属性值的对象。context 包含 4 个属性 attrs、slots、emit、expose 。
1 2 3 4 5 <com-a-p-i name ="hello" title ="home" @comfun ="comfun" > <template #a > <h3 > slot</h3 > </template > </com-a-p-i >
1 2 3 4 5 6 7 8 9 10 11 12 13 14 15 16 17 18 19 20 21 22 23 24 <template > <div > {{count}} <slot name ="a" > </slot > </div > </template > <script > export default { props : { name : String , }, setup (props, { attrs, slots, emit, expose } ) { console .log ("setup" ); console .log ("props" , props.name ); console .log ("attrs" , attrs.title ); console .log ("slots" , slots.a ()); emit ("comfun" , "向父组件传递数据" ); return { count :1 }; }, beforeCreate ( console .log ("beforeCreate" ); } } </script >
context 的 expose 能显式地限制该组件暴露出的 property,当父组件通过 模板 ref 访问该组件的实例时,将仅能访问 expose 函数暴露出的内容。
setup 发返回值为一个对象,该对象中的属性值是暴露给组件访问的。属性值只有是 composition api 创建的响应式对象才能够像 data 中的属性一样响应式的改变。
2. 常用 API: 1 2 3 4 5 6 7 8 9 10 11 12 13 14 15 16 17 18 19 20 21 22 23 24 25 26 27 28 29 30 31 32 33 34 35 36 37 38 39 40 41 42 43 44 45 46 47 48 49 50 import { ref, reactive, toRef, toRefs, readonly, isRef, computed } from 'vue' ;export default { setup ( let num = 1 ; const count = ref (0 ); count.value ++; const user = reactive ({ name :"hi" , age :18 }); user.age ++; const name = toRef (user,"name" ); name.value = "ha" ; const { age } = toRefs (user); const userIsRef = isRef (user); let add = (value ++; let nameNum = computed ({ get : ()=> user.name + count.value , set : val =>name + count.value + val }); nameNum.value = 1 ; return { num, count, ...toRefs (user), add, nameNum, } }, }
3. watch 与 watchEffect:
监听属性值变化:
监听属性方法同样需要导入:import { watch, watchEffect } from 'vue';
如下两方法初始时都会默认执行一次,且当方法内的某个属性发生改变时就会执行一次
1 2 3 4 5 6 7 8 9 10 11 watch (()=> { console .log ("watch" , count.value ); }); const stop = watchEffect ((oninvalidate )=> { console .log ("watchEffect" , count.value ); oninvalidate (()=> { console .log ("before" ); }); },{ }); stop ();
指定监听:
watch 参数1 指定要监听的响应式数据
参数2 监听方法,newV 监听的新值, oldV 旧值(默认初始化时为 undefined)
参数3 为监听配置对象,指定监听后默认初始化是不会执行一次的 immediate 为 true 时可以使监听方法初始化时执行一次。
1 2 3 4 5 6 7 8 9 10 11 12 const a = ref (9 );watch (a, (newV, oldV )=> { console .log ("watch" , count.value ); }, { immediate : true }); watch ([a,count], ([newA, newCount], [oldA, oldCount] )=> { console .log ("watch" , newA, oldA, newCount, oldCount); }, { immediate : true });
监听对象响应式数据的某个属性或想监听响应式数据的 value 时需要使用函数方式返回:
1 2 3 4 watch ([()=> a.value ,()=> user.name ], ([newA, newName], [oldA, oldName] )=> { console .log ("watch" , newA, oldA, newName, oldName); }, { immediate : true });
如果监听 ref 且 ref.value 是深层次对象时需要配置 deep: true 开启深层次监听,而 reactive 默认开启:
1 2 3 4 5 6 watch (refV, (newV, oldV )=> { }, { deep : true , flush : "pre" });
4. 生命周期: 注意使用以下生命周期 API 也需要导入如:import { onMounted } from 'vue'
选项式 API
Hook inside setup
beforeCreateNot needed*(setup)
createdNot needed*(setup)
beforeMountonBeforeMount创建之前
mountedonMounted创建完成
beforeUpdateonBeforeUpdate更新之前
updatedonUpdated更新完成
beforeUnmountonBeforeUnmount卸载(销毁)之前
unmountedonUnmounted卸载完成
errorCapturedonErrorCaptured
renderTrackedonRenderTracked
renderTriggeredonRenderTriggered
activatedonActivatedkeep-alive 缓存的组件激活
deactivatedonDeactivatedkeep-alive 缓存的组件停用
当选项 API 与组合式 API 生命周期同时存在时会先执行 setup 中的,也就是先执行组合式 API 生命周期方法。
nextTick: $nextTick 在 setup 中使用 nextTick 代替:
1 2 3 4 5 import { nextTick } from "vue"; const change = async ()=>{ await nextTick(); // 同步调用 }
5. provide 与 inject:
provide、inject 是 vue 让父组件给子组件提供数据访问的一种方式,使多层子组件(如孙子组件)下依然可以访问到父组件的属性值。
1. 选项式 API:
如 App.vue 中:
1 2 3 4 5 6 7 8 9 10 data ( return { msg : "this is App msg" } }, provide ( return { msg : this .msg , } }
在第 3 层的子组件中:
1 2 3 4 export default { inject : ['msg' ], }
2. 组合式 API:
App.vue 中:
1 2 3 4 5 6 7 8 9 10 import { ref, provide } from 'vue' ; export default { setup ( let msg = ref ("this is App msg" ); provide ('msgStr' , msg); return {msg} } }
子组件中:
1 2 3 4 5 6 7 import { inject } from 'vue' ; export default { const msgStr = inject ('msgStr' ); return {msgStr} }
组合式 API 使用 provide、inject 注入的父属性是 响应式 的,即我们在这里修改 msgStr 的值父组件 msg 也会相应改变。
6. VueRouter: Vue Router 和 组合式 API | Vue Router (vuejs.org)
this.$router 与 this.$route 在 setup 中无法直接访问,因此 VueRouter 提供了 useRouter 和 useRoute 函数
1 2 3 4 5 6 7 8 9 10 11 12 13 14 15 16 import { useRoute, useRouter, onBeforeRouteLeave, onBeforeRouteUpdate } from 'vue-router' ;export default { setup ( const route = useRoute (); const router = useRouter (); watch (()=> route.params , (newId, oldId )=> { console .log (newId.id ); }); onBeforeRouteLeave ((to, from )=> {}); onBeforeRouteUpdate (async (to, from )=> {}); } }
注意 useRoute、useRouter(包括 Vuex 的 useStore) 等方法获取对象必须在 setup 中的最外层,如果在方法中使用 useRouter() 会是 undefined。
7. Vuex: 组合式API | Vuex (vuejs.org)
对于 this.$store Vuex 提供了 useStore 函数
为了访问 state 和 getter ,需要创建 computed 引用以保留响应性,这与在选项式 API 中创建计算属性等效
javascript 1 2 3 4 5 6 7 8 9 10 11 12 13 14 15 import { computed } from 'vue'; import { useStore } from 'vuex'; // 引入 useStore export default { setup () { const store = useStore(); // 必须在 setup 最外层获取对象 // store.commit('increment') store.dispatch('asyncIncrement') return { // 在 computed 函数中访问 state count: computed(() => store.state.count), // 在 computed 函数中访问 getter double: computed(() => store.getters.double) } } }
Vite + TS 创建项目:
Ref 全家桶:
1 2 3 4 5 6 7 8 9 10 11 12 13 import { ref, Ref , isRef } from 'vue' type T = {name : string} const name :Ref <T> = ref ({name : 'ruoxijun' });console .log (isRef (name)); const myDiv = ref<HTMLDivElement >(); myDiv.value onMounted (()=> { myDiv.value .innerText = "myDiv" ; });
shallowRef 只支持 浅层次 数据响应,注意 ref 底层有调用 triggerRef(如同一方法中同时更改 ref 与 shallowRef 的值时,shallowRef 视图也会被更新)。
1 2 3 4 5 6 import { shallowRef, triggerRef } from 'vue' const o = shallowRef ({name : "haha" });o.value .name = "xx" ; triggerRef (o); o.value = { name : "oo" };
Reactive 全家桶:
1 2 3 4 5 6 7 8 import { reactive, readonly } from 'vue' type T = string[] const o = reactive<T>([]);o.push("hh" ); const read = readonly(o);
它与 shallowRef 类似提供浅层数据响应,且会被 ref 与 reactive 影响(每次对 ref 或者 reactive 的更改都会将所有的组件模板渲染更新为最新数据)。
1 2 3 4 5 import { shallowReactive } from 'vue' const obj = shallowReactive ({one : {two : "two" }});obj.one .two = "hh" ; obj.one = {two : "xx" }
To 全家桶:
1 2 3 4 5 6 import { reactive, toRef } from 'vue' const o = reactive ({name : "ruoxijun" , age : 18 });const name = toRef (o, "name" ); name.value = "haha" ; o.name = "xx" ;
toRefs 将响应式对象的每个属性都转为 ref 对象并解构:
1 2 3 4 import { reactive, toRefs } from 'vue' const o = reactive ({name : "ruoxijun" , age : 18 });const {name, age} = toRefs (o);
1 2 3 4 import { reactive, toRaw } from 'vue' const o = reactive ({name : "ruoxijun" , age : 18 });const obj = toRaw (o);
computed:
1 2 3 4 5 6 import { ref, Ref , computed } from 'vue' const count : Ref <number> = ref (0 );const con = computed<number>(()=> { return count.value + 1 ; });
less:
安装 less 到开发环境:
1 npm install less less-loader -D
在 style 标签上添加 lang="less" :
1 <style lang="less" scoped></style>
组件传值: 父传子: 1 2 3 4 5 6 7 8 9 10 11 12 13 14 15 16 withDefaults (defineProps<{ msg : string }>(),{ msg : ()=> "默认值" });
子传父:
1 2 3 4 5 6 7 8 9 10 <script setup lang="ts"> // 定义接收参数的方法 const send = (msg:string)=> { console.log(msg); } </script> <template> <!-- 绑定子组件的传参事件 --> <HelloWorld @on-click="send" msg="Vite + Vue" /> </template>
1 2 3 4 5 6 7 8 9 const emit = defineEmits<{ (e : "on-click" , msg : String ):void }>(); const send = ( emit ("on-click" , "传参值" ); }
暴露组件属性:
1 2 3 4 5 defineExpose ({ count, send });
1 2 3 4 5 6 const hello = ref ();onMounted (()=> { console .log (hello.value .count ); hello.value .send (); });
递归组件:
使用递归组件:
1 2 3 4 5 6 7 8 9 10 11 12 13 14 15 16 17 18 19 20 21 22 23 24 25 26 27 28 29 30 31 32 33 34 35 36 37 38 39 40 41 42 43 44 45 46 47 48 49 50 51 <script setup lang="ts"> import { reactive } from "vue"; import Tree from "./components/Tree.vue"; // 引入递归组件 interface Tree { // 定义递归数据类型 name: string; checked: boolean; children?: Tree[]; } const data = reactive<Tree[]>([ // 递归数据 { name: "1", checked: false, children: [ { name: "1-1", checked: true, children: [], }, ], }, { name: "2", checked: false, children: [], }, { name: "3", checked: true, children: [ { name: "3-1", checked: false, children: [ { name: "3-1-1", checked: true, children: [], }, ], }, ], }, ]); </script> <template> <div> <!-- 使用递归组件并传入递归数据 --> <Tree :data="data"></Tree> </div> </template>
实现递归组件 Tree.vue :
1 2 3 4 5 6 7 8 9 10 11 12 13 14 15 16 17 18 19 20 21 22 23 24 25 26 27 28 29 30 31 32 33 <template> <div v-for="item in data" @click.stop="treeClick($event)" class="tree"> <input type="checkbox" v-model="item.checked"><span>{{ item.name }}</span> <!-- 当前组件递归,v-if 停止递归条件 --> <Tree v-if="item?.children?.length" :data="item?.children"></Tree> </div> </template> <script setup lang="ts"> interface Tree { // 递归数据类型 name: string; checked: boolean; children?: Tree[]; } const props = defineProps<{ data?: Tree[] // 接收递归数据 }>(); const treeClick = (e: Event)=> { console.log(e.currentTarget); } </script> <script lang="ts"> export default { name: "Tree" // 默认使用文件名作为组件名 } </script> <style scoped> .tree{ margin-left: 25px; } </style>
1 2 3 4 ({}).a ({}).a .b ({})?.a ?.b (null || undefined ) ?? []
v-model:
父组件中:
1 2 3 4 5 6 7 8 9 10 11 12 <script setup lang="ts"> import A from "./components/A.vue"; const isShow = ref<boolean>(true); const text = ref<string>("hello"); </script> <template> <div> 父组件 - isShow:{{isShow}} - text:{{text}} </div> <div> <button @click="isShow = !isShow"> 开关 </button> </div> <A v-model="isShow" v-model:textVal="text"></A> </template>
子组件中:
1 2 3 4 5 6 7 8 9 10 11 12 13 14 15 16 17 18 19 20 21 22 23 24 <template> <div v-if="modelValue"> <div> A - isShow:{{modelValue}}</div> <input :value="textVal" @input="textValChange"> <button @click="close"> 关闭 </button> </div> </template> <script setup lang="ts"> const props = defineProps<{ modelValue: boolean, // v-model 默认为 modelValue 接收 textVal: string // 接收 v-model:textVal }>(); const emits = defineEmits(['update:modelValue', 'update:textVal']); const close = ()=>{ emits('update:modelValue', false); } const textValChange = (e:Event)=>{ // e.target 默认 EventTarget 类型需要断言为 HTMLInputElement 才能获取到 value 值 const el = e.target as HTMLInputElement; emits('update:textVal', el.value); } </script>
自定义修饰符:
1 2 3 4 5 6 7 const props = defineProps<{ modelValue : boolean, textVal : string textValModifiers?:{ isAdd : boolean } }>();
组件上 v-model:textVal.isAdd="text" ,组件内 props?.textValModifiers?.isAdd 有使用修饰符值为 true 。
动态组件: 使用方式:
对象方式实现动态组件:
如果使用 ref 或者 reactive 包装组件 vue 会代理组件属性监听变化,而这会耗费性能且 vue 会在控制台给出警告。因此建议在对象中使用 markRaw 包裹组件而普通变量使用 shallowRef 包裹组件。
1 2 3 4 5 6 7 8 9 10 11 12 13 14 15 16 17 18 19 20 21 22 23 24 25 26 27 28 29 30 <script setup lang="ts"> import { ref, reactive, markRaw, shallowRef } from "vue"; import A from "./components/A.vue"; import B from "./components/B.vue"; import C from "./components/C.vue"; interface o { name: string; com: any; } const comIndex = ref(0); const componentId = shallowRef(A); // 不建议使用 ref const data = reactive<o[]>([ { name: "A", com: markRaw(A), }, // 使用 markRaw 包裹 { name: "B", com: markRaw(B), }, { name: "C", com: markRaw(C), }, ]); const swTab = (com: any, index: number)=>{ componentId.value = com; comIndex.value = index; } </script> <template> <div class="tab"> <div :class="{ active: comIndex === index }" class="tab_item" @click="swTab(item.com, index)" v-for="(item, index) in data" > {{ item.name }} </div> </div> <component :is="componentId"></component> </template>
字符串方式实现动态组件:
1 2 3 4 5 6 7 8 9 10 11 12 13 14 15 16 17 18 19 20 21 22 23 24 25 26 <script setup lang="ts"> import { ref, reactive } from "vue"; interface o { name: string; com: any; } const comIndex = ref(0); const componentId = ref("A"); // 使用组件字符串名 const data = reactive<o[]>([ { name: "A", com: "A", }, { name: "B", com: "B", }, { name: "C", com: "C", }, ]); const swTab = (com: any, index: number)=>{ componentId.value = com; comIndex.value = index; } </script> <script lang="ts"> import A from "./components/A.vue"; import B from "./components/B.vue"; import C from "./components/C.vue"; export default { components:{ A, B, C }// 注册组件 } </script>
异步组件:
1 2 const A = defineAsyncComponent (()=> import ("./components/A.vue" ));
transition: 基础使用:
使用 transition 标签包裹需要添加动画的元素, name 的值是定义动画 class 的前缀:
1 2 3 <transition name ="fade" > <component :is ="componentId" > </component > </transition >
定义动画:
1 2 3 4 5 6 7 8 .fade-enter-from { opacity : 0 ; } .fade-enter-active { transition : all .5s ease; } .fade-enter-to { opacity : 1 ; } .fade-leave-from { opacity : 1 ; }.fade-leave-active { transition : all .5s ease; }.fade-leave-to { opacity : 0 ; }
animate.css:
transition 也支持指定动画的 class 名:
1 2 3 4 5 6 7 8 9 10 <transition enter-active-class ="" enter-from-class ="" enter-to-class ="" leave-active-class ="" leave-from-class ="" leave-to-class ="" > <component :is ="componentId" > </component > </transition >
安装 animate.css:
Animate.css 官网
在组件中引入 animate.css:
使用:
新版中都需要添加 animate__animated 类, duration 属性可以指定执行时间(毫秒),还可通过对象属性方式单独设置显示和隐藏的动画时间 {enter: 500, leave: 500} 。
1 2 3 4 5 6 7 <transition :duration ="500" enter-active-class ="animate__animated animate__rubberBand" leave-active-class ="animate__animated animate__swing" > <component :is ="componentId" > </component > </transition >
生命周期:
生命周期方法
对应 Class
时期
@before-enter
enter-from-class
显示动画之前
@enter
enter-active-class
显示过度
@after-enter
enter-to-class
显示结束
@enter-cancelled
显示过度被打断
@before-leave
leave-from-class
隐藏动画之前
@leave
leave-active-class
隐藏过度
@after-leave
leave-to-class
隐藏结束
@leave-cancelled
隐藏过度被打断
所有生命周期方法参数 1 是动画元素对象,而 过度方法 接收参数 2 它是过度回调代表过度执行完成,默认它在动画结束后自动执行。
1 2 3 const enterActive = (el: Element, done: Function )=>{ done (); }
appear:
appear 页面初次加载效果,只在页面初始化后执行一次:
1 2 3 4 5 6 7 <transition appear-from-class ="" appear-active-class ="" appear-to-class ="" > <component :is ="componentId" > </component > </transition >
TransitionGroup:
为列表添加动画属性,使用方式与 transition 大体一致。
默认不会给列表多包装一层,可使用 tag 属性指定包装一层元素。
列表必须添加 key 属性。
1 2 3 4 5 6 7 8 <transition-group tag ="div" enter-active-class ="animate__animated animate__wobble" leave-active-class ="animate__animated animate__rubberBand" move-class ="列表元素平移动画(元素位置改变)" > <div class ="list" v-for ="item in list" key ="item" > {{ item }}</div > </transition-group >
gsap.js:
1 2 3 4 5 6 7 8 9 10 11 12 13 14 15 16 17 <script setup lang="ts"> import gsap from "gsap"; const number = reactive({ numberVal: 0, showNumber: 0 }); const numberChange = (n: number)=>{ gsap.to(number, { duration: 0.3, // 过度时间 showNumber: n // 注意该属性名与显示动画的属性值名要相同 }); } </script> <template> <input type="number" v-model="number.numberVal" @input="numberChange(number.numberVal)" > <span>{{ number.showNumber.toFixed(0) }}</span> </template>
Mitt:
vue 中 import 第一次加载文件时执行 js 并将获取到的内容放入缓存中,之后 import 文件都是从缓存中获取,因此 import 获取的对象实例都是 单例 。
安装 mitt:
Vue2 使用 EventBus 进行组件通信,而 Vue3 推荐使用 mitt 。
main.ts 中全局挂载:
1 2 3 4 5 6 7 8 9 10 11 12 13 14 15 import mitt from 'mitt' ; const app = createApp (App );const Mitt = mitt (); declare module "vue" { export interface ComponentCustomProperties { $Bus : typeof Mitt ; } } app.config .globalProperties .$Bus = Mitt ; app.mount ('#app' );
组件中使用:
1 2 3 4 5 6 7 8 9 10 11 12 13 14 15 16 17 18 19 20 21 import { getCurrentInstance } from "vue" ;const instance = getCurrentInstance ();const emit = ( instance?.proxy ?.$Bus .emit ("on-emit" , "传递参数值(可多个)" ); } import { getCurrentInstance } from "vue" ;const instance = getCurrentInstance ();instance?.proxy ?.$Bus .on ("on-emit" ,(data )=> { console .log (data); }); instance?.proxy ?.$Bus .on ("*" ,(type,data )=> { console .log (type, data); });
unplugin-auto-import: antfu/unplugin-auto-import
安装:
1 npm i -D unplugin-auto-import
配置 vite.config.ts :
1 2 3 4 5 6 7 8 import AutoImport from 'unplugin-auto-import/vite' export default defineConfig ({ plugins : [vue (), AutoImport ({ imports : ['vue' ], dts : 'src/auto-import.d.ts' }),] })
不用 import 在组件中直接使用 ref 等。
自定义指令: 1 2 3 4 5 6 7 8 9 10 11 12 13 14 15 16 17 18 19 20 21 22 23 24 <script setup lang="ts"> import { Directive, DirectiveBinding, ref } from "vue"; import A from "./components/A.vue"; type Dir = { val: string } // 自定义指令 v-my,赋值函数方式是 mounted 与 updated 同时触发相同行为的简写 const vMy:Directive = (el, binding:DirectiveBinding<Dir>)=> { console.log(binding.value.val); } /* 完整写法与生命周期: const vMy:Directive = { created(){}, beforeMount(){}, mounted(){}, beforeUpdate(){}, updated(){}, beforeUnmount(){}, unmounted(){}, } */ </script> <template> <A v-my="{val: 'hello'}"></A> </template>
Hooks: Mixins: 在 vue2 中常使用 Mixins 抽取公共属性,mixins 中的属性会被组件中的同名属性覆盖,mixins 中的生命周期函数会比组件中同名生命周期函数先执行(不会覆盖)。
1 2 3 4 5 6 export default { data ( return {...} }, methods :{} }
1 2 3 4 5 6 <script> import mixin from './mixins'; // 引入 mixins.js export default { mixins:[mixin], // mixins 数组,属性自动注入组件中 } </script>
Hooks: 在 vue3 中推荐使用 Hooks 使用函数导出与引入的方式。
hooks/index.ts (名称可自定义)中:
1 2 3 4 5 6 import { Ref , ref } from "vue" ; export default function (Ref <string >{ const hello = ref ("hello" ); return hello; }
1 2 3 import hook from "./hooks" ; const hello = hook ();
定义全局变量: vue2: 1 Vue .prototype $my = "hello" ;
vue3:
1 2 3 4 5 6 7 8 9 10 11 12 13 14 const app = createApp (App );declare module "vue" { export interface ComponentCustomProperties { $My : string , $MyFun : Function } } app.config .globalProperties .$My = "hello" ; app.config .globalProperties .$MyFun = ()=> {} app.mount ('#app' );
1 2 3 4 5 6 7 8 9 <script setup lang="ts"> import { getCurrentInstance } from "vue"; const app = getCurrentInstance(); // 获取当前实例 app?.proxy?.$MyFun(); </script> <template> <div> 直接调用 - {{ $My }} </div> </template>
样式穿透:
1 2 3 /deep/.el-switch__core { background-color : black; }
1 2 3 :deep (.el-switch__core) { background-color : black; }
:slotted() 插槽选择器
:global() 全局选择器
动态 css:
1 2 3 4 5 6 7 8 9 10 11 12 <script lang="ts" setup> import { ref } from 'vue' const color = ref<string>("red"); const style = ref({ color: "red" }); </script> <style lang="less" scoped> div{ color: v-bind(color); background-color: v-bind('style.color'); // 对象需要引号方式包裹 } </style>
Pinia 安装使用: Pinia 官网地址:Pinia (vuejs.org)
安装 Pinia:
在 main.ts 中注册引入:
1 2 3 4 5 6 7 8 9 import { createPinia } from 'pinia' ; const store = createPinia (); const app = createApp (App );app.use (store); app.mount ('#app' );
在 store\index.ts 内:
1 2 3 4 5 6 7 8 9 10 11 12 13 14 import { defineStore } from "pinia" ;export const useStore = defineStore ('main' , { state : ()=> ({ name : 'haha' }), getters : { }, actions : { } });
组件中使用:
1 2 3 4 import { useStore } from './store' ;const store = useStore ();console .log (store.name );
state: 1. 直接修改: 1 store.name = "ruoxijun" ;
2. $patch(推荐): 1 2 3 4 5 6 7 8 store.$patch({ name : "aaa" }); store.$patch((state:any )=> { state.name = "ooo" ; });
3. $state: 此方式需要修改 state 中的所有属性,才能使用。
1 store.$state = { name : "ccc" }
4. actions(推荐):
在 store 的 actions 中定义方法:
1 2 3 4 5 6 7 8 9 export const useStore = defineStore ('main' , { state : ()=> ({ name : "haha" }), actions : { setName (name : string ): void { this .name = name; } } });
在组件中使用方法:
5. storeToRefs: store 可以直接解构出 state 中的属性但不具有响应式,因此 Pinia 提供了 storeToRefs:
1 2 3 4 import { storeToRefs } from 'pinia' ;const { name } = storeToRefs (store);name.value = "yyy" ;
getters、actions: getters、actions 中定义的方法可以使用 this 调用 store 中的属性或方法。
API: $reset: $subscribe: 1 2 3 4 store.$subscribe((mutations, state )=> { console .log (mutations, state); }, { detached : true });
$onAction: 1 2 3 4 store.$onAction((context )=> { console .log (context); }, true );
持久化存储: